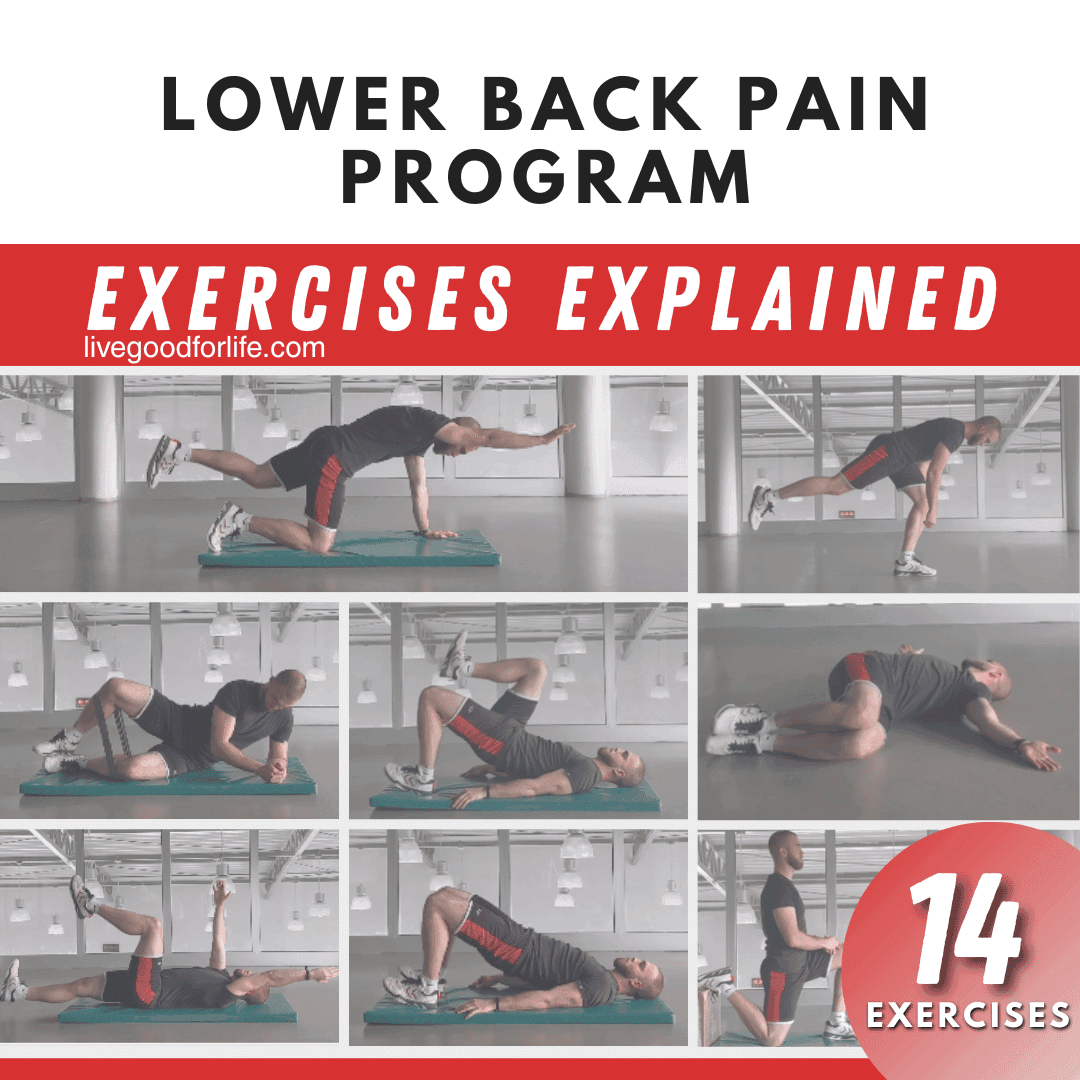
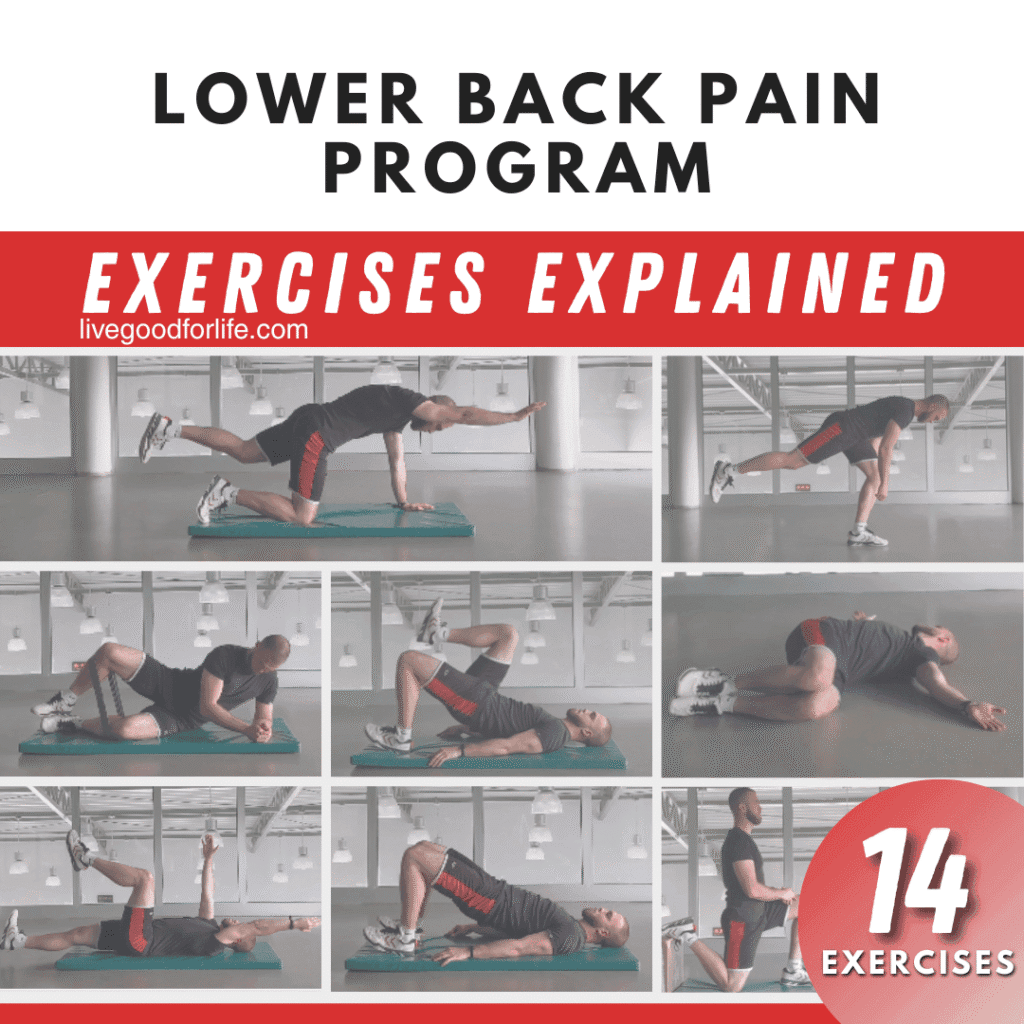
Lower Back Pain Program: Exercises, Daily Tips, and Simple Ways to Move Better
Lower back pain can make everyday life feel harder than it should. Sitting, bending, lifting, walking, and even getting comfortable at night can all feel more difficult when the lower back is irritated. For some people, it comes and goes, while for others it becomes a more persistent problem.
The good news is that lower back pain often responds well to a gradual, practical approach. Instead of focusing only on short-term relief, it helps to consider how the body moves, how the hips and core support the spine, and how simple daily habits may be adding more strain than you realize.
This lower back pain program is built around movement, control, mobility, and better support through the body. The goal is not just to feel better today, but to move better going forward.
Why Lower Back Pain Happens So Often
The lower back deals with a lot of physical demand every day. The body is constantly sitting, standing, twisting, bending, reaching, carrying, and lifting. When the hips and core are not doing enough of that work, the lower back often ends up taking more pressure than it should.
Modern routines can make that worse. Long periods of sitting, less movement during the day, weak glutes, stiff hips, and poor bending mechanics can all build strain over time. Even if pain feels sudden, the body may have been dealing with small movement problems for weeks or months before symptoms became obvious.
Lower back pain is also not always just about “tight muscles.” In many cases, it is linked to repeated pressure, poor support, and movement patterns that overload the lumbar area. That is why a more complete plan usually works better than simply resting or relying on temporary comfort measures alone.
Why Movement Matters
In many cases, smart movement is one of the most helpful parts of recovery and prevention. Gentle, controlled exercise can help the body in several ways.
It can improve how the muscles around the spine and hips work together. Strengthen the glutes and core so the lower back has to compensate less. It can also improve mobility in areas that may be stiff, especially the hips and upper back.
That does not mean pushing through sharp pain or doing hard workouts too soon. It means choosing movements that build control, improve support, and help the body feel more capable over time.
The Main Areas This Program Works On
A well-rounded lower back pain routine usually focuses on four key areas:
Hip Strength and Mobility
If the hips are weak or stiff, the lower back often picks up extra work. Better hip function can help reduce that overload.
Core Strength and Control
The core supports the spine during movement. The goal is not endless crunches, but better stability and control.
Better Bending Mechanics
Learning to hinge through the hips rather than rounding the lower back can make a big difference in daily life.
Mobility in the Upper Back
When the upper back stays stiff, the lower back may try to compensate. Improving thoracic mobility can help the body move more evenly.
Daily Habits That Can Help
Small daily habits can support the program and reduce unnecessary strain on the lower back.
Avoid Sitting Too Long
Try not to sit for long stretches without standing up. A short walk or gentle stretch break every 45 minutes can help.
Use Better Bending Mechanics
When brushing your teeth, picking something up, or reaching lower, try to bend more through the hips and less through the lower back.
Clean Up Your Diet
A diet heavy in highly processed foods may promote greater inflammation, making discomfort harder to manage. Choosing more balanced, whole-food meals can support overall wellness and may help support the body’s natural response to inflammation.
Some people also choose to add an anti-inflammatory supplement to a broader routine. If you want to look at one option, you can learn more about Factor 4.
Exercises Often Included in a Lower Back Pain Program
These exercises are commonly used to improve core stability, glute strength, hip control, and mobility. Move slowly, stay controlled, and stop or modify anything that clearly worsens pain.
Hip Hinge Technique
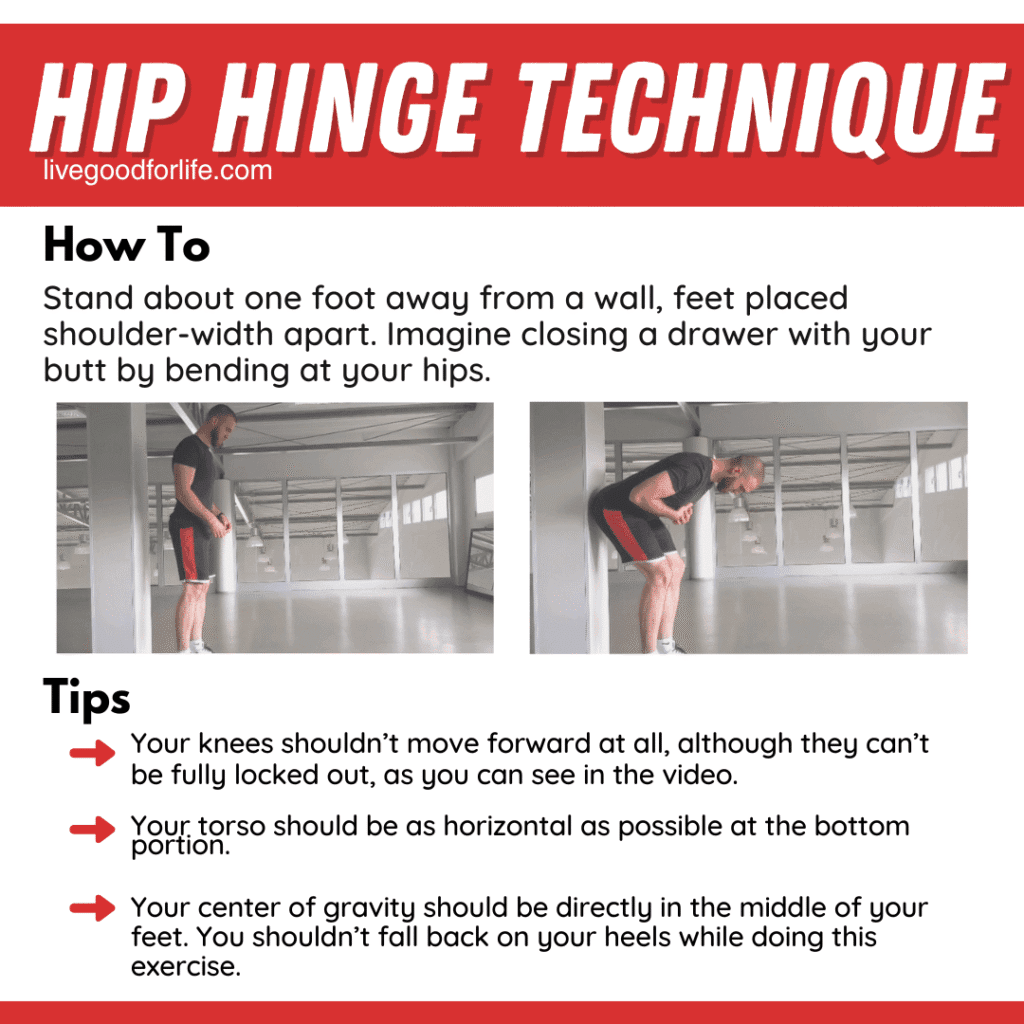
Stand about one foot away from a wall with your feet shoulder-width apart. Push your hips back as if you are trying to close a drawer with your glutes. Keep your knees soft, but do not let them drift forward too much. Your torso should tilt forward because the hips are moving back, not because the spine is rounding.
This is one of the most useful movement patterns in the whole program because it teaches you how to bend in a way that puts less stress on the lower back.
Dead Bug
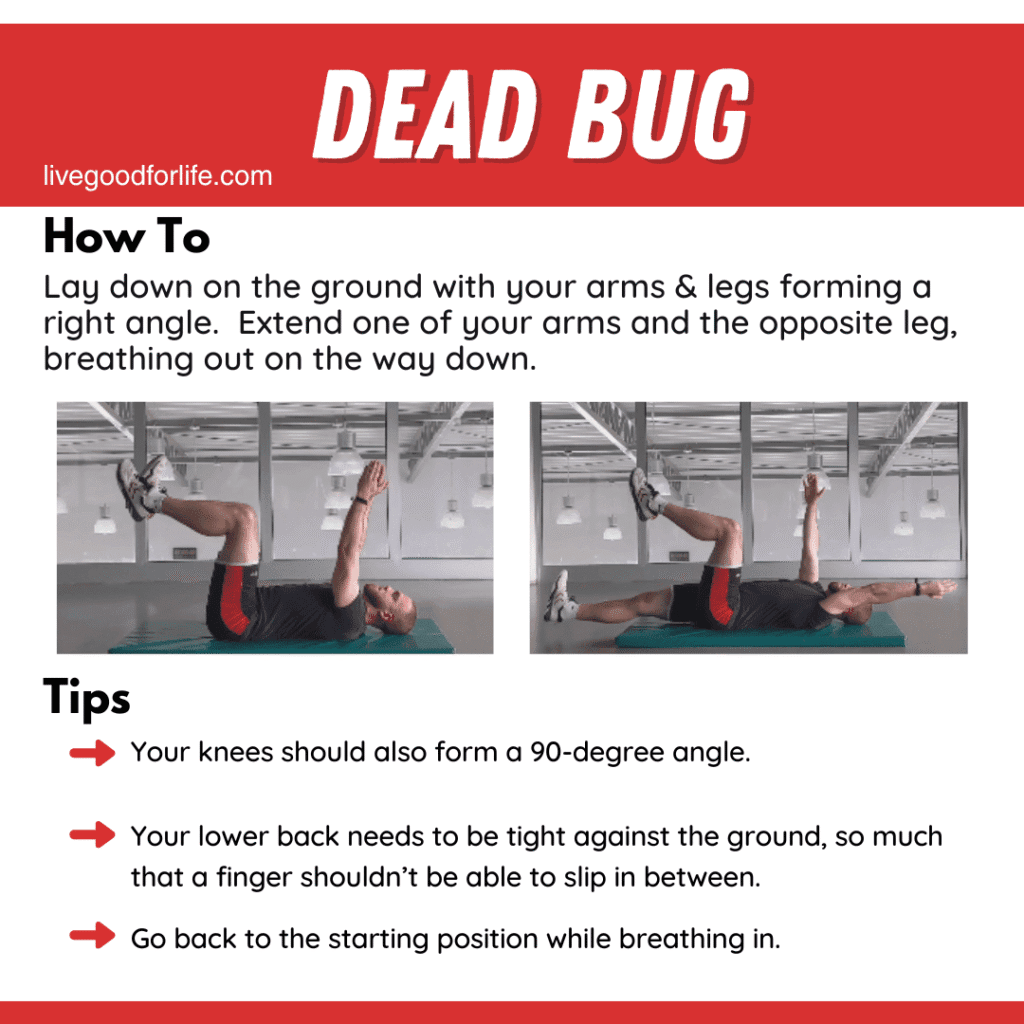
Lie on your back with your arms pointed upward and your knees bent so your hips and knees form right angles. Slowly extend one arm and the opposite leg while breathing out. Return to the start as you breathe in, then switch sides.
Try to keep your lower back gently pressed into the floor the whole time. Move with control and do not rush the exercise.
Bird Dog

Start on your hands and knees with your hands under your shoulders and your knees under your hips. Extend one arm forward and the opposite leg back while breathing out. Return to the start with control, then switch sides.
The goal is to keep the torso stable while the arm and leg move. Avoid twisting or arching through the lower back.
Side Plank

Lie on your side with your legs extended and your bottom elbow directly under your shoulder. Lift your hips so your body forms one straight line from head to feet. Hold for the prescribed time, then repeat on the other side.
Try not to let the hips sag. Keep the body aligned and steady from start to finish.
Pallof Press
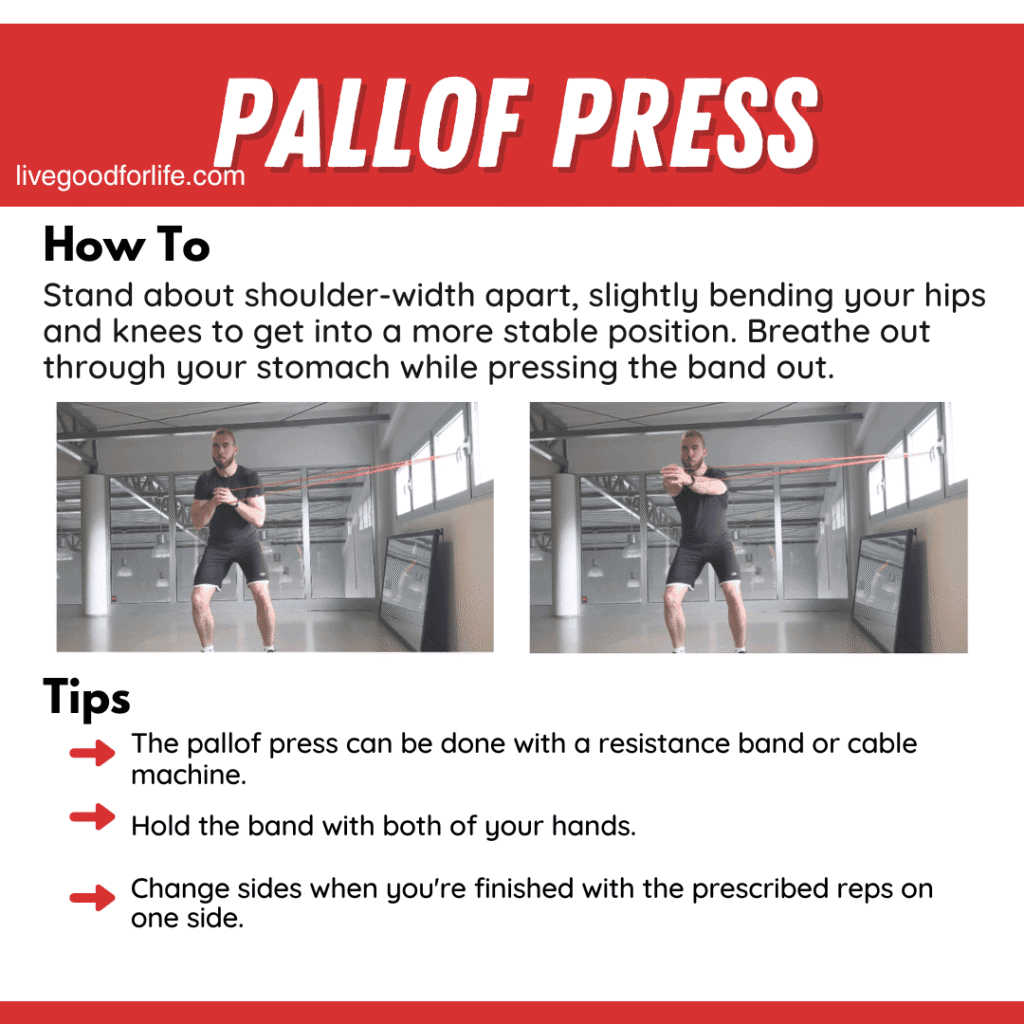
Stand about shoulder-width apart with a slight bend in your hips and knees. Hold a resistance band or cable at chest level with both hands. Press your hands straight out in front of you while breathing out, then bring them back in with control.
This exercise trains the core to resist rotation. The challenge is to keep your torso from turning as the resistance pulls to one side.
Glute Bridge
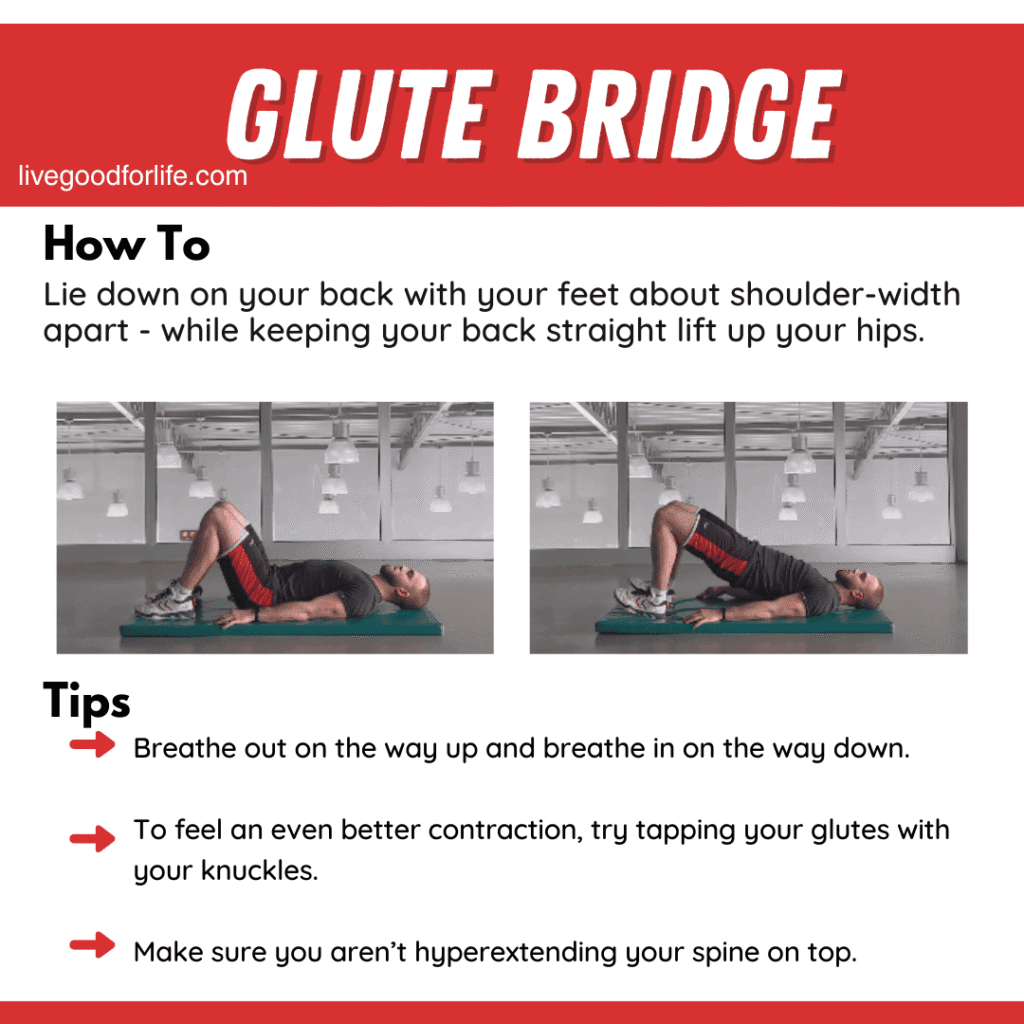
Lie on your back with your feet about shoulder-width apart and your knees bent. Press through your feet and lift your hips upward while keeping your upper back on the floor. Lower slowly.
Breathe out on the way up and in on the way down. At the top, squeeze the glutes without over-arching the lower back.
Single-Leg Glute Bridge
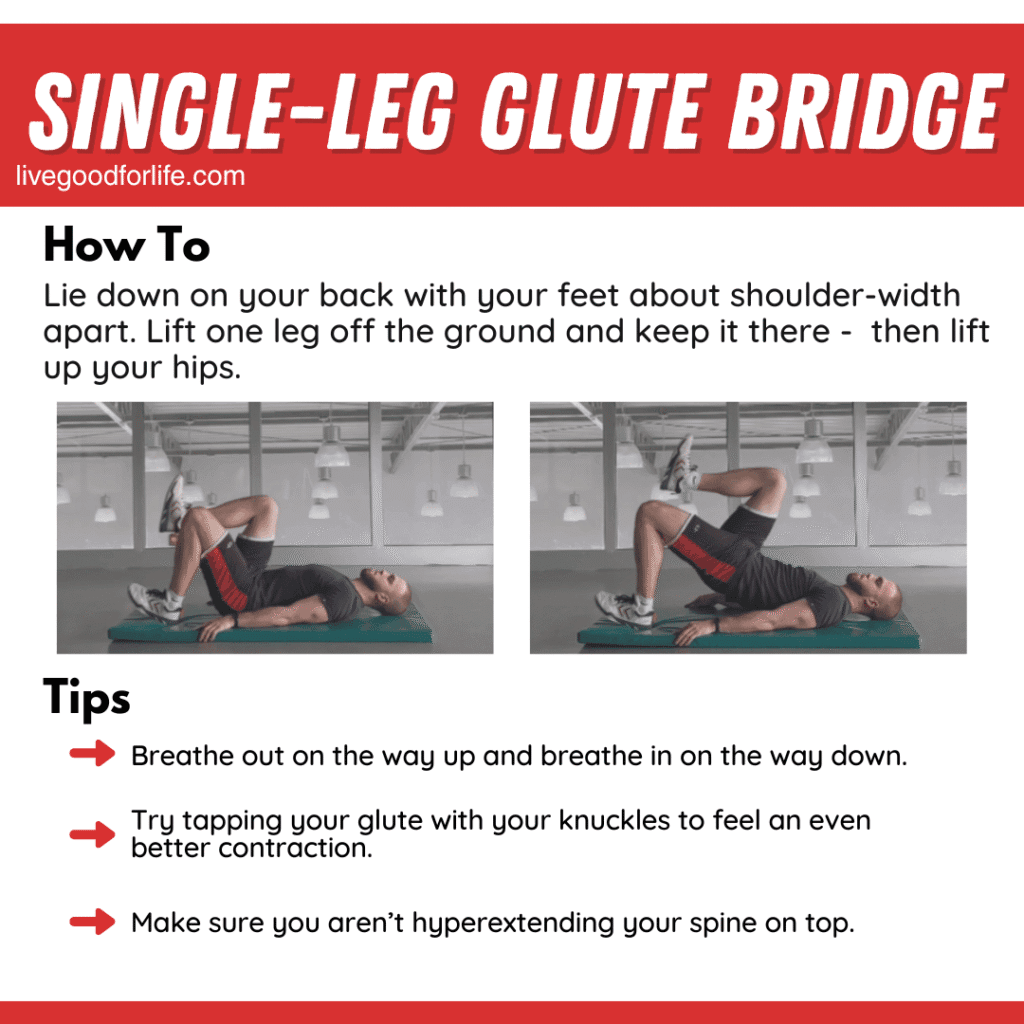
Set up like a regular glute bridge, then lift one foot off the floor and keep it raised. Press through the grounded foot and lift your hips upward, then lower with control.
Keep the hips level as much as possible. This version adds more challenge and helps each side work more independently.
Clamshells
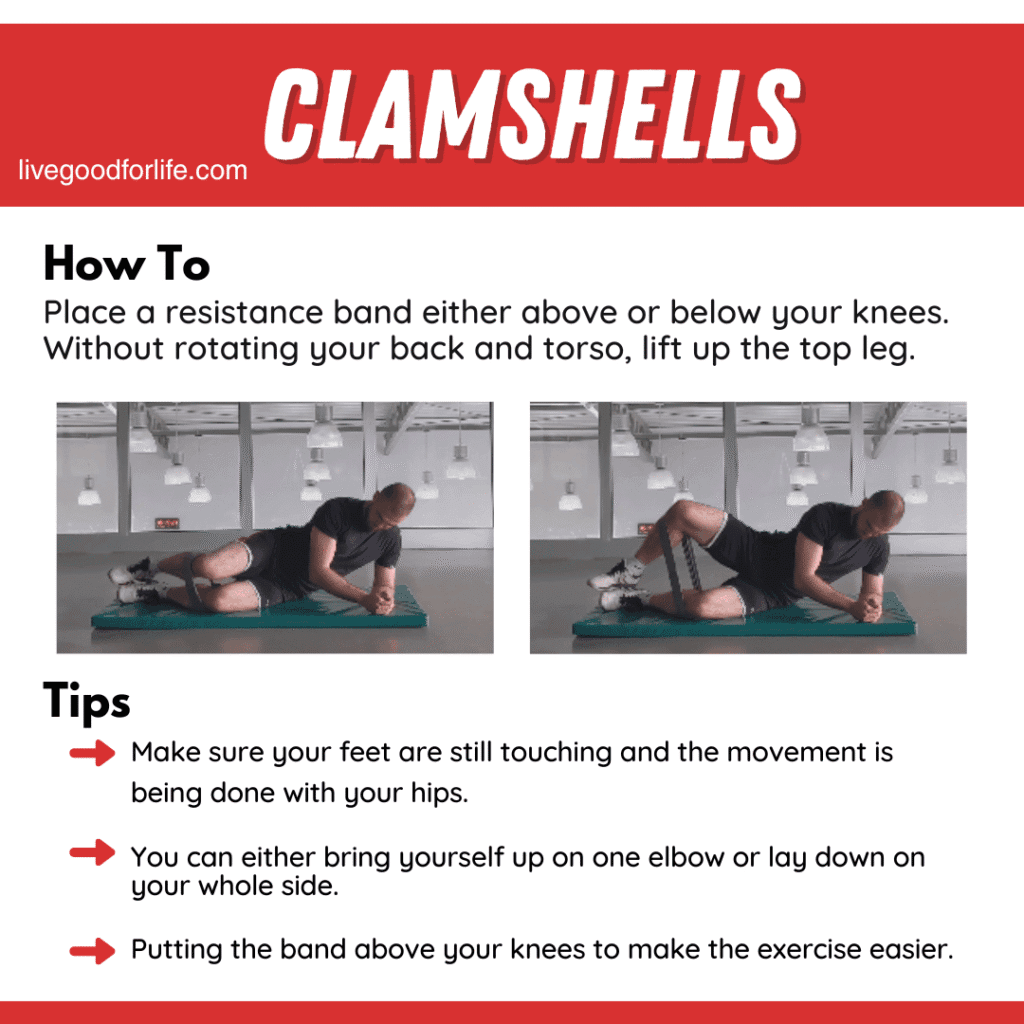
Lie on your side with your knees bent and your feet together. Keeping the feet in contact, lift the top knee without rolling your torso backward. Lower slowly and repeat.
You can use a resistance band above or below the knees. The movement should come from the hips, not from rotating the whole body.
Donkey Kicks

Start on your hands and knees with a neutral spine. Keeping one knee bent, lift that leg upward using the glute, then return with control.
You do not need to kick high. Keep the lower back steady and focus on the glute doing the work.
Single-Leg Deadlift
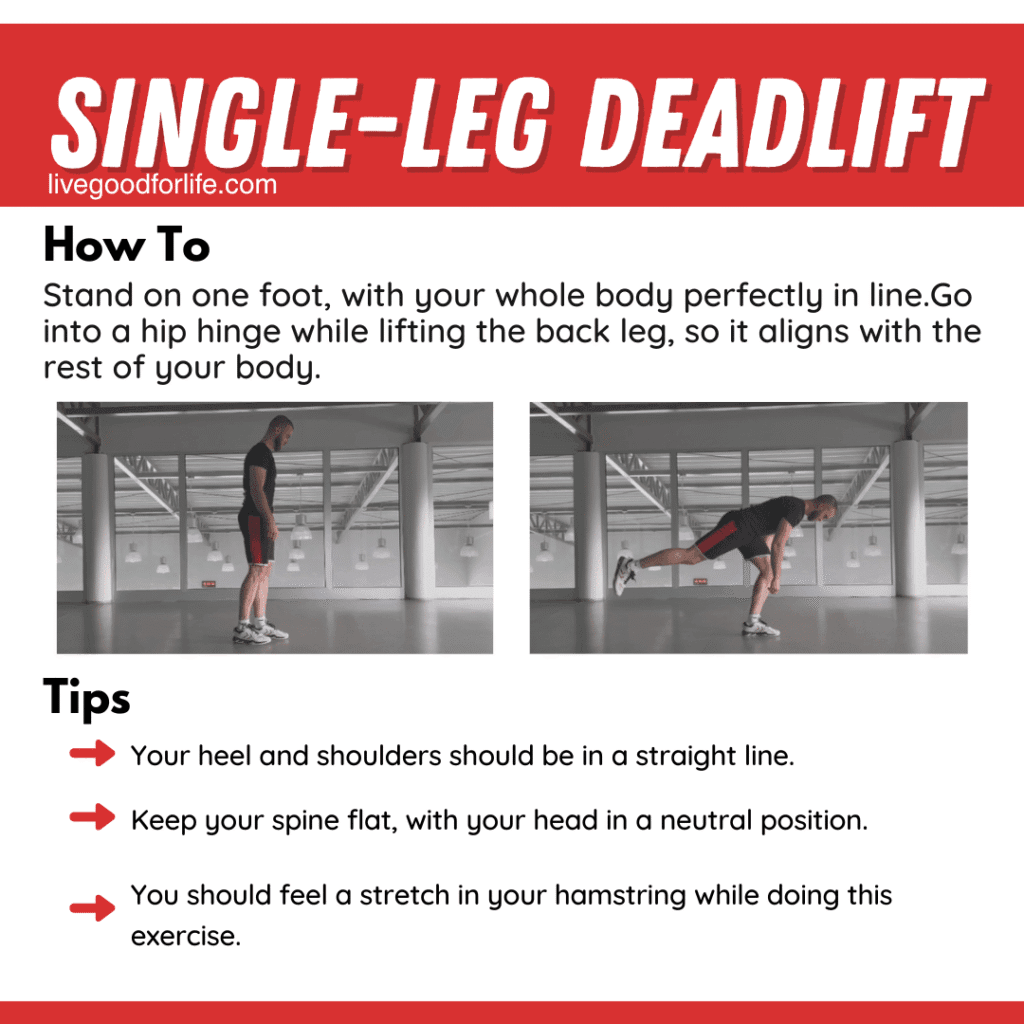
Stand on one foot and start hinging forward from the hips while the back leg lifts behind you. Keep your spine long and your head in a neutral position as you lower.
You should feel the work mainly in the standing leg, especially the hamstring and glute. Move slowly and use support nearby if balance is still difficult.
Couch Stretch
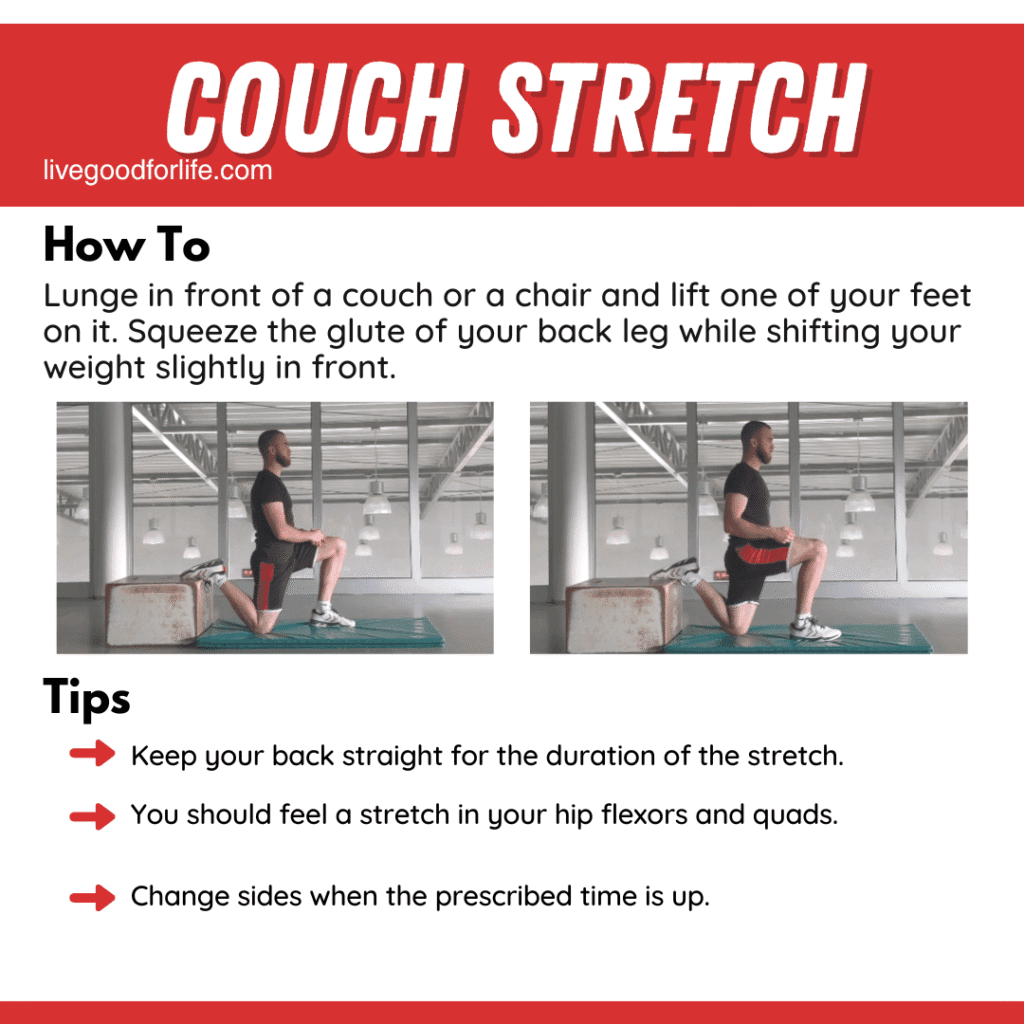
Set up in front of a couch, bench, or chair with one foot elevated behind you and the other leg in front. Gently squeeze the glute of the back leg and shift slightly forward until you feel a stretch in the front of the hip and thigh.
Keep your torso upright and avoid collapsing into the lower back.
Cross-Legged Stretch
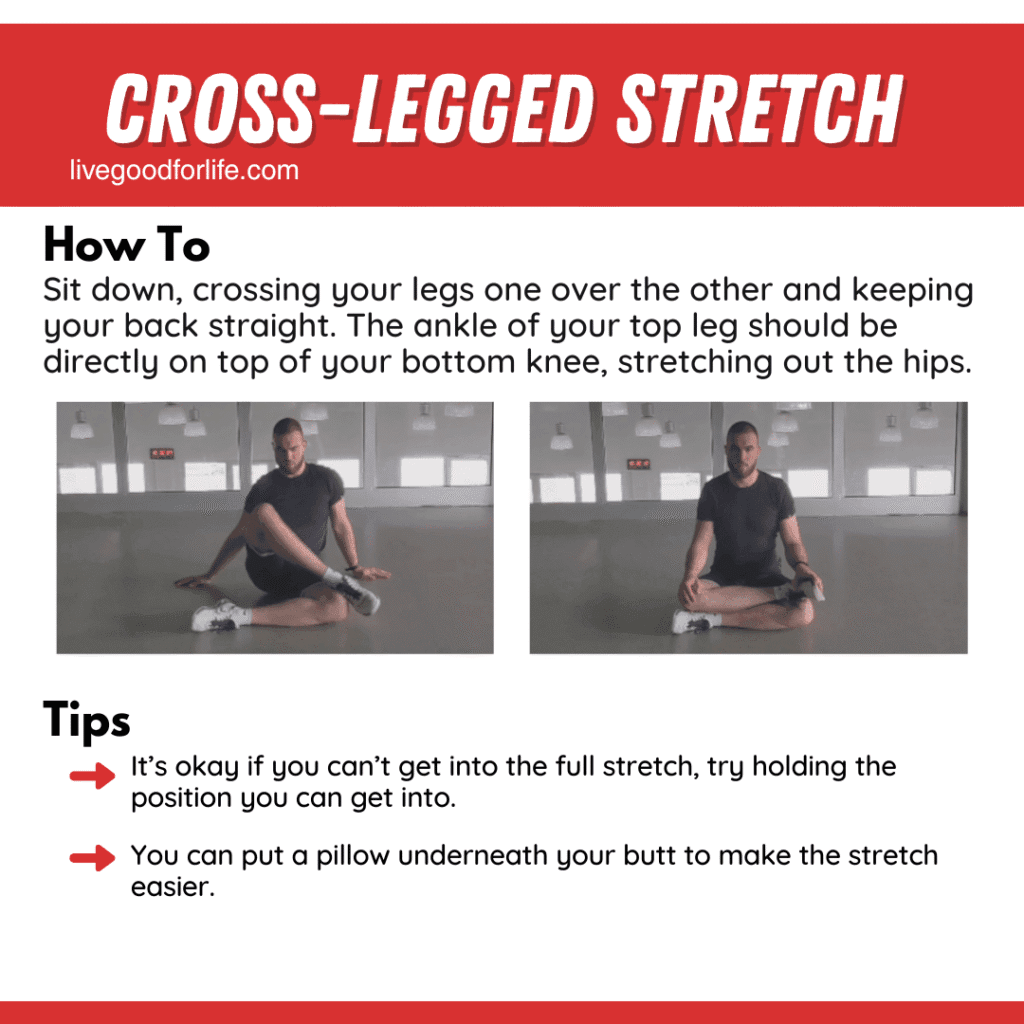
Sit on the floor and cross one leg over the other while keeping your back as upright as possible. Let the stretch settle into the hips.
It is fine to use a pillow or cushion under you if that makes the position more comfortable to hold.
Kneeling Thoracic Stretch
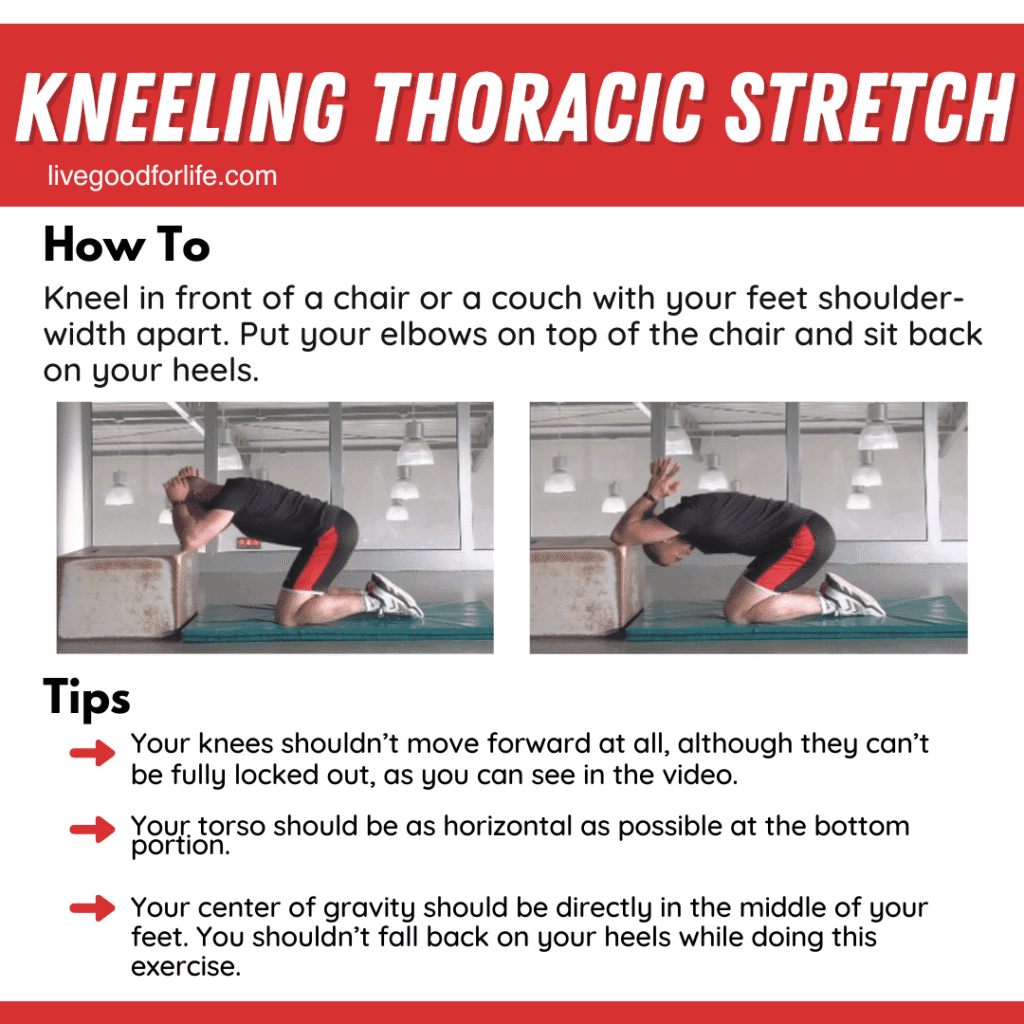
Kneel in front of a chair, bench, or couch and place your elbows on top. Sit your hips back toward your heels while letting the chest drop gently downward.
This is meant to improve mobility through the upper back, not force the lower back into an uncomfortable position.
Open Book Stretch
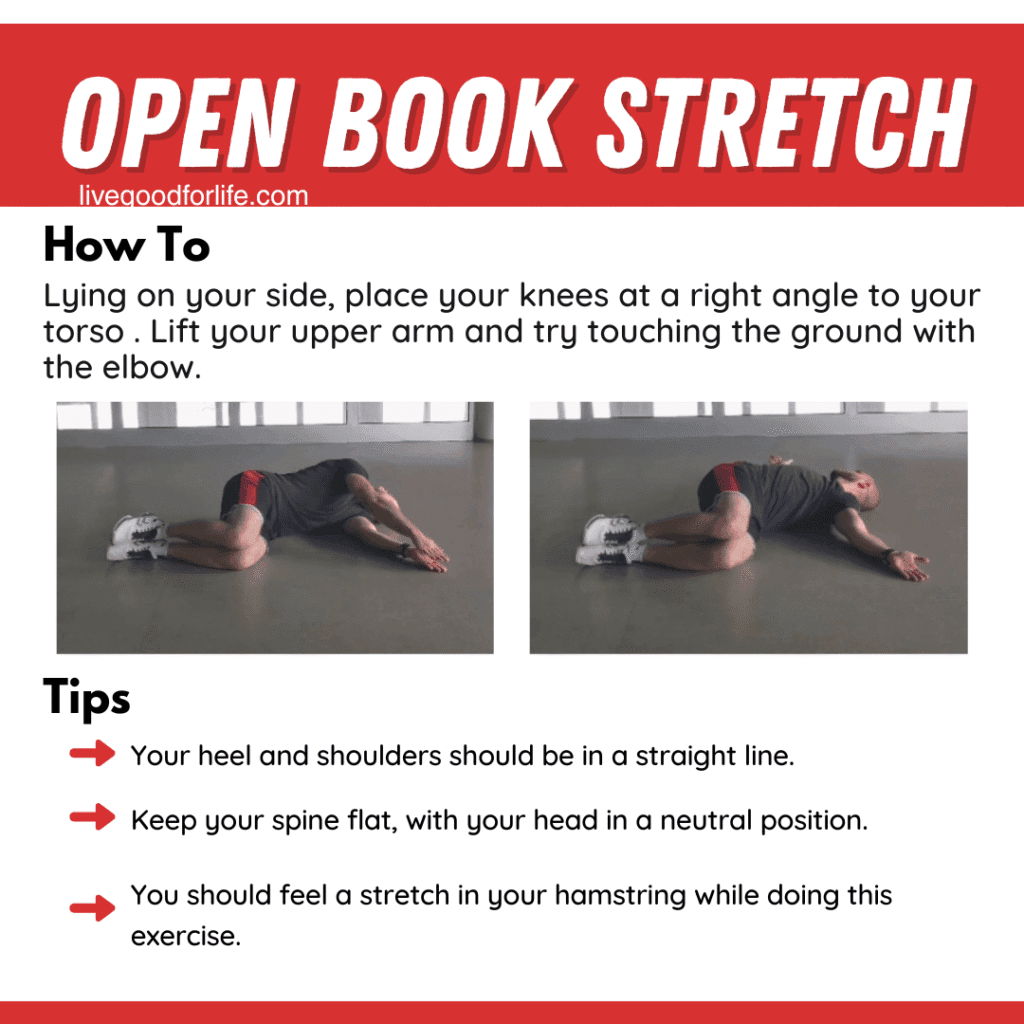
Lie on your side with your knees bent. Reach the top arm across your body, then slowly open it back the other way as your chest rotates.
Try to keep the knees stacked while allowing the upper back and chest to open. This is a gentle rotation movement, so there is no need to force the range.
How to Put These Exercises Together
These exercises are meant to be followed as a 4-week lower back support program, with 4 workout days per week. Instead of doing the movements randomly, the routine is designed to build step by step. Some exercises focus on core stability, some strengthen the glutes and hips, and others improve mobility through areas that often affect the lower back. Together, they help create better support, better movement, and better control.
Week 1: Learn the foundations and start supporting inflammation
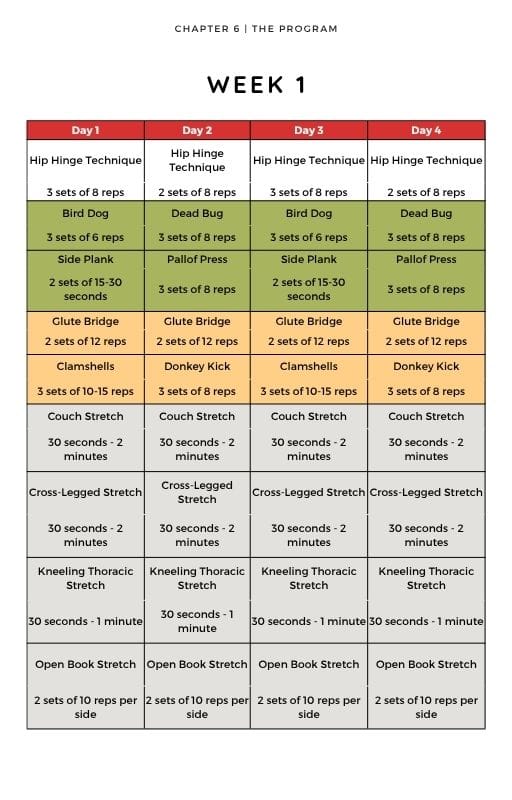
The first week is all about learning the core movement patterns and building a strong foundation. The hip hinge technique is practiced often during this stage because it helps teach safer bending mechanics for daily life. Core exercises such as bird dog, dead bug, side plank, and Pallof press begin improving stability, while glute bridge, clamshells, and donkey kicks help wake up the glutes and hips. Mobility work remains important, with couch stretch, cross-legged stretch, kneeling thoracic stretch, and open-book stretch helping reduce stiffness.
This first week is not about going hard. It is about improving form, learning control, and helping the body feel more supported.
This is also a good time to begin cleaning up your diet and adding an anti-inflammatory wellness support option such as Factor 4. While movement is the main focus of the program, some people like to start supporting the body’s inflammation response early, so by the end of Week 1, they are already building both movement habits and wellness support together.
Week 2: Add a little more challenge
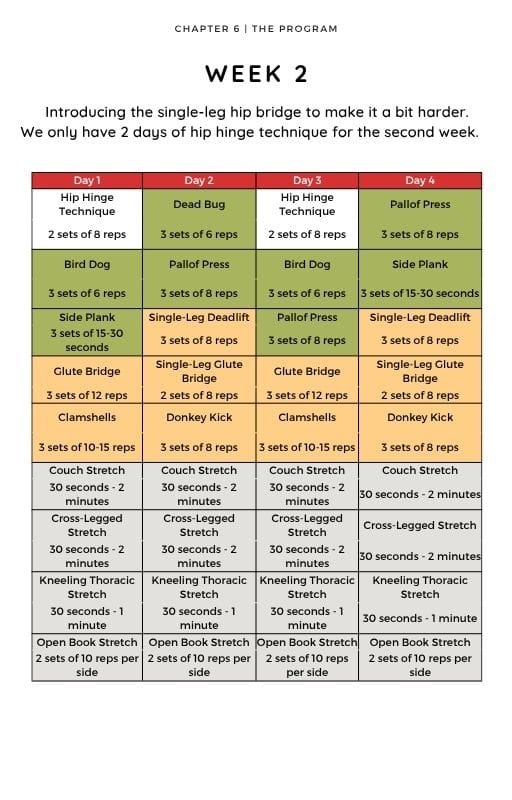
In Week 2, the program starts progressing. The single-leg glute bridge is introduced to increase the challenge a little, and hip hinge technique appears less often than in the first week. This shows the body is moving from basic skill practice toward more active strengthening and control.
You are still working on the same key areas — core stability, glute activation, hip strength, and mobility — but now with slightly more demand on each side of the body. By this point, if someone started with Factor 4 in Week 1, they may also feel that they have settled into a better overall support routine alongside the exercises.
Week 3: Increase intensity and confidence
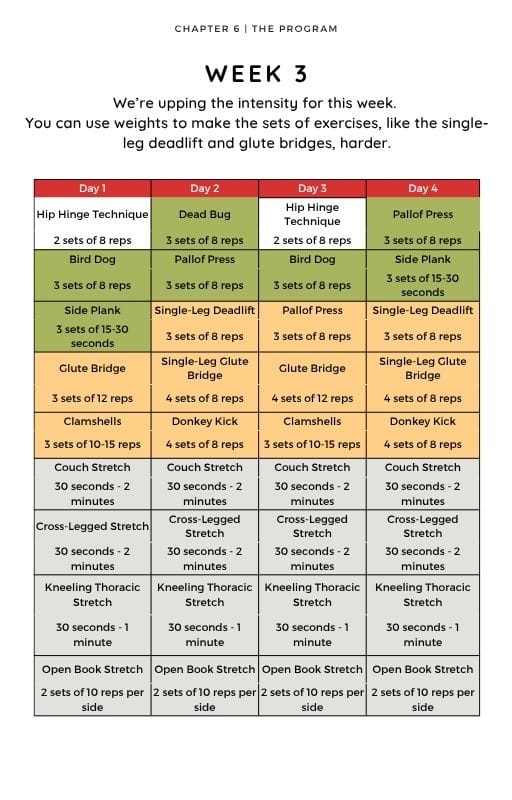
Week 3 raises the overall challenge again. Some exercises have more sets, and movements like the single-leg deadlift and glute bridge become more demanding. Hip hinge work is still present, but less central than in the beginning.
At this stage, the program is bringing together:
- core stability
- glute and hip strengthening
- mobility for the hips and thoracic spine
- better control during everyday movement
This week helps build more confidence while continuing the gradual progression. The goal is still quality over speed.
Week 4: Finish with stronger support and better movement habits
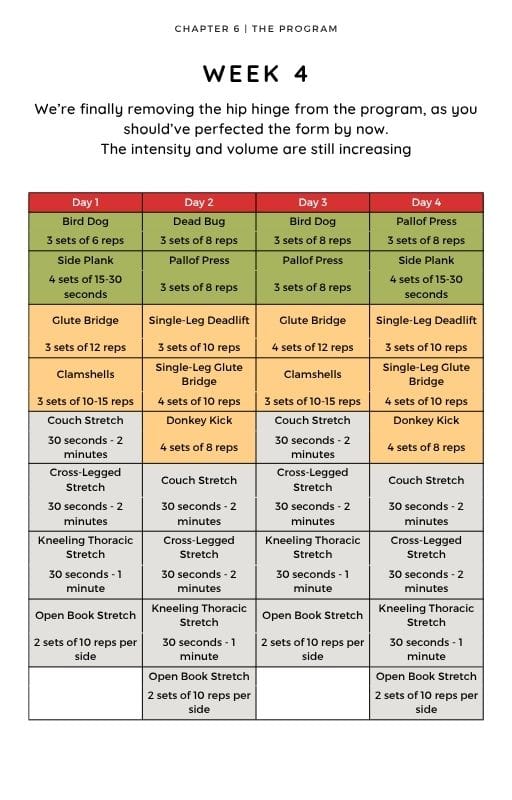
By Week 4, the hip hinge technique drill is removed, with the idea that you should be more comfortable with the pattern by now. The routine now leans more on strengthening and control, using exercises such as bird dog, dead bug, side plank, Pallof press, glute bridge, single-leg deadlift, single-leg glute bridge, clamshells, and donkey kicks, while mobility work remains consistent.
This final week continues increasing intensity and volume, helping you finish the program with stronger hips, better core control, improved mobility, and better movement habits overall.
The weekly structure in simple terms
Across the full 4 weeks, the plan follows a clear structure:
- 4 training days per week
- a mix of core, glute, hip, and mobility work
- gradual progression from basic technique to more challenge
- steady support for the lower back through strength, control, and flexibility
A practical note before you begin
If one exercise clearly bothers your back, it is better to pause, modify, or skip that movement rather than force it. The goal is to build support around the lower back, not push through sharp pain. Move with control, focus on good form, and let the program progress week by week.
Alongside that, some people also like to support the process from a wellness angle by improving food choices and beginning an anti-inflammatory support option such as Factor 4 from the start, so both movement and inflammation support are being worked on together early in the program.
A Soft Support Option for Inflammation Wellness
Alongside movement, mobility, and better daily habits, some people like to look at wellness support options that fit into a broader routine. If you want to explore one gentle option, you can add Factor 4 to your routine and see whether it fits your overall wellness approach.
Frequently Asked Questions About a Lower Back Pain Program
What is a lower back pain program?
A lower back pain program is a structured routine designed to help support the lower back through targeted exercises, mobility work, and better daily movement habits. It often includes core stability exercises, glute strengthening, hip mobility work, and gentle stretching to help the body move with better support and control.
Can exercise really help lower back pain?
In many cases, yes. The right kind of exercise may help improve how the muscles around the spine, hips, and core work together. This can help reduce extra strain on the lower back and support better movement over time. The key is choosing controlled, appropriate exercises rather than pushing into painful or overly intense movements too soon.
What are the best exercises for lower back pain?
Some of the most commonly used exercises in a lower back pain routine include the hip hinge, dead bug, bird dog, side plank, Pallof press, glute bridge, clamshells, and gentle mobility exercises such as the open book stretch and couch stretch. The best exercises depend on the person, their current comfort level, and how their body responds.
How often should I do lower back pain exercises?
A common starting point is around three to four sessions per week. That gives the body regular practice while still allowing time to recover between workouts. A structured 4-week lower back pain program often uses four exercise days each week with gradual progression from week to week.
How long does it take to notice a difference?
That varies from person to person. Some people feel small improvements in movement, confidence, or stiffness within the first week or two. Others may need longer to notice a more meaningful change. Consistency, good form, and appropriate exercise selection usually matter more than trying to move too fast.
Should I do lower back pain exercises every day?
Not usually. While light walking, gentle stretching, and healthy movement throughout the day can be helpful, the strengthening part of the program is often better done a few times a week rather than every single day. The body still needs time to recover and adapt.
Is walking good for lower back pain?
Walking can be a very helpful low-impact activity for many people with lower back discomfort. It encourages circulation, gentle movement, and less stiffness from prolonged sitting. It is often a good addition to a lower back pain routine, as long as it feels comfortable and does not make symptoms worse.
Can weak glutes cause lower back pain?
Weak or underactive glutes can contribute to lower back strain because the hips may not be doing enough of the work they are meant to do. When that happens, the lower back may start compensating during walking, standing, or bending. Strengthening the glutes is one reason exercises like glute bridges, clamshells, and donkey kicks are often included in these routines.
Why is core strength important for lower back pain?
The core helps support the spine during both exercise and everyday movement. Better core control may help reduce unnecessary strain on the lower back. This is why many lower back pain programs use stability-based exercises like dead bugs, bird dogs, side planks, and Pallof presses instead of relying only on crunch-style movements.
What is the hip hinge and why does it matter?
The hip hinge is a movement pattern that teaches you how to bend through the hips instead of rounding through the lower back. It matters because it can make daily movements like picking things up, leaning forward, and reaching lower feel safer and more controlled. It is one of the most useful skills in a lower back pain program.
Are stretches enough to fix lower back pain?
Stretching can help, especially if stiffness in the hips or upper back is contributing to discomfort, but stretching alone is usually not enough. Most people benefit more from a combination of mobility work, strength exercises, core stability, and improved daily movement habits.
Which stretches help lower back pain the most?
That depends on the person, but common options in a lower back pain program include the couch stretch, cross-legged stretch, kneeling thoracic stretch, and open book stretch. These stretches are often used because the hips and thoracic spine can affect how much strain the lower back ends up taking.
Can sitting too much make lower back pain worse?
Yes, for many people it can. Long periods of sitting may increase stiffness, reduce circulation, and keep the hips in a shortened position for too long. That can create more pressure and discomfort in the lower back. Taking regular movement breaks can help.
How often should I get up if I sit a lot?
A helpful target is to stand up, walk, or stretch briefly every 45 minutes or so. Even short breaks can help reduce stiffness and give the lower back a break from staying in one position too long.
Should I rest completely when my lower back hurts?
Not always. While severe pain may require more caution, complete rest for too long is often not the best long-term answer. In many cases, gentle movement and a gradual return to appropriate activity are more helpful than becoming too inactive. Still, the right approach depends on the situation and how your body feels.
Is it normal for some exercises to feel harder on one side?
Yes, that is very common. One side may be weaker, stiffer, or less stable than the other. Single-side exercises like single-leg glute bridges and single-leg deadlifts often make those differences more obvious. The goal is not perfect symmetry right away, but gradual improvement.
What should I do if one exercise bothers my back?
If one exercise clearly increases pain, stop that movement and either modify it or leave it out for now. It is usually better to continue with the exercises that feel manageable than to force a movement that your body is not tolerating well.
Should I push through pain during the program?
You should not push through sharp, worsening, or radiating pain. Mild effort, muscle fatigue, or a gentle stretch sensation can be normal, but pain that feels wrong is a sign to stop or adjust. The program should help build support, not create more irritation.
Can lower back pain come from tight hips?
Yes, tight hips can contribute to lower back discomfort. When the hips do not move well, the lower back may try to compensate. That is one reason many lower back pain routines include both hip strengthening and hip mobility work.
Can upper back stiffness affect lower back pain?
Yes. If the thoracic spine is stiff and not moving well, the lower back may take on extra motion during twisting or reaching. This is why upper back mobility exercises are often included in a lower back pain program.
Is a 4-week lower back pain program enough?
A 4-week program can be a helpful starting point for improving movement, support, and body awareness. Some people feel noticeably better by the end, while others may need to repeat the program, progress into a more general strength routine, or get more individual guidance depending on their situation.
What happens after finishing the program?
After finishing the program, some people move into a more general strength and mobility routine to maintain progress. Others may repeat the program with better form or slightly more confidence. The next step depends on how your body feels and how much improvement you noticed.
Can beginners do a lower back pain program at home?
Yes, many of these exercises can be done at home with minimal equipment. Movements like bird dog, dead bug, glute bridge, clamshells, and mobility stretches are often beginner-friendly when done slowly and with good form.
Do I need weights for this lower back pain program?
Not necessarily. Many of the foundational exercises use bodyweight only. In later stages, some people choose to add more challenge with resistance bands or light weights, but that is usually a progression rather than a requirement at the beginning.
Can resistance bands help with lower back pain exercises?
Yes, resistance bands can be useful for exercises such as clamshells and Pallof presses. They add challenge without needing bulky equipment and can be a practical option for home workouts.
Can inflammation affect lower back discomfort?
Inflammation may play a role in how discomfort feels for some people, especially when combined with stress, poor recovery habits, and a heavily processed diet. Improving overall wellness habits may help support the body’s natural response to inflammation alongside movement and exercise.
Can supplements be part of a lower back wellness routine?
Some people choose to include wellness supplements as part of a broader routine that also includes better movement, better recovery, and healthier food choices. For example, some may consider options such as omega-3s, turmeric, curcumin, or Factor 4, which combine these ingredients as part of a general inflammation-support approach. Supplements are usually best thought of as support, not a replacement for movement and healthy habits.
Is Factor 4 meant to replace exercise for lower back pain?
No. Factor 4 is best used as part of a broader lower back wellness routine, not as a replacement for movement and exercise. It combines ingredients chosen to support the body’s natural response to inflammation, which may be helpful alongside better mobility, core work, glute strengthening, and healthier daily habits. The strongest approach is usually to combine supportive nutrition, smart movement, and consistent recovery habits.
When should I see a healthcare professional for lower back pain?
It is a good idea to speak with a qualified healthcare professional if your pain is severe, worsening, traveling down the leg, causing numbness or weakness, following an injury, or not improving over time. Ongoing symptoms may need more individual assessment and guidance.
Can I still do this program if I am new to exercise?
Yes, many people start a lower back pain routine with little or no training background. The important thing is to begin gently, focus on form, and progress gradually rather than trying to do too much too soon.
What is the biggest mistake people make with lower back pain exercises?
One of the biggest mistakes is rushing. People often try to do too much too soon, move too fast, or ignore form in favor of more reps. A lower back pain program usually works best when the exercises are done slowly, consistently, and with attention to control.
Final Thoughts
A lower back pain program does not need to be complicated to be useful. Often, the biggest improvements come from doing the basics well: moving with control, building better support through the hips and core, improving mobility where needed, and practicing better movement habits in daily life.
The goal is not perfection. It is steady progress. When the body starts moving better, the lower back often feels more supported too.
Medical disclaimer: This article is for educational purposes only and is not medical advice. If your pain is severe, worsening, radiating, or not improving, speak with a qualified healthcare professional before starting or changing any exercise or supplement routine.
Bonus: Read This Far? Take the Free Anti-Inflammatory Guide With You
Bonus: Support Your Lower Back Routine from Another Angle
If you made it to the end of this page, you’re probably ready to do more than just read — you want to start making practical changes.
Alongside the exercises in this lower back pain program, you can also support your progress with better daily habits that help the body manage inflammation more effectively.
That’s why I’m giving you access to my free Anti-Inflammatory Guide, where you’ll discover simple foods, habits, and support strategies that may help reduce inflammation and support energy, recovery, and everyday comfort.
You’ll also receive a free personalized health assessment to help you better understand what your body may need by registering below.