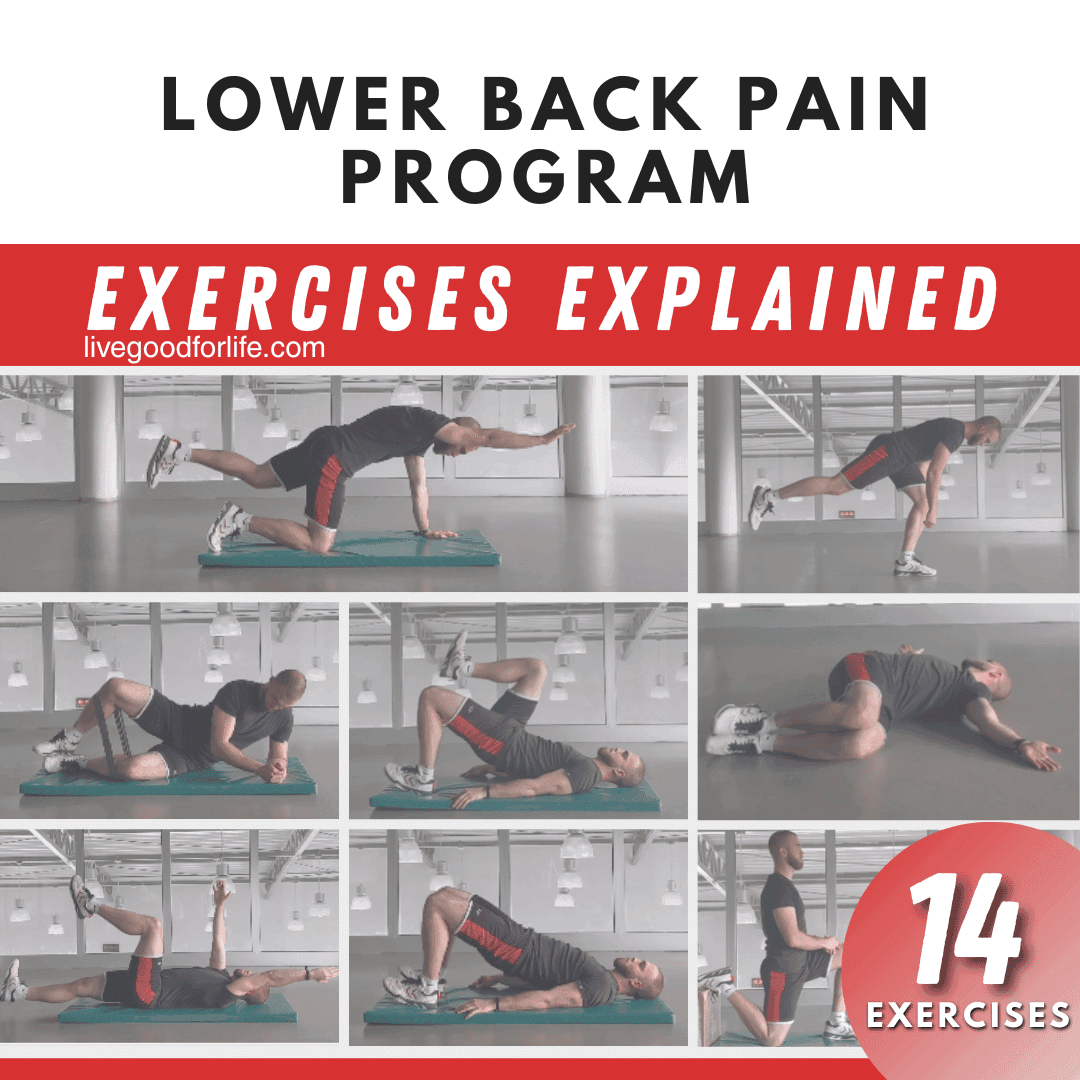
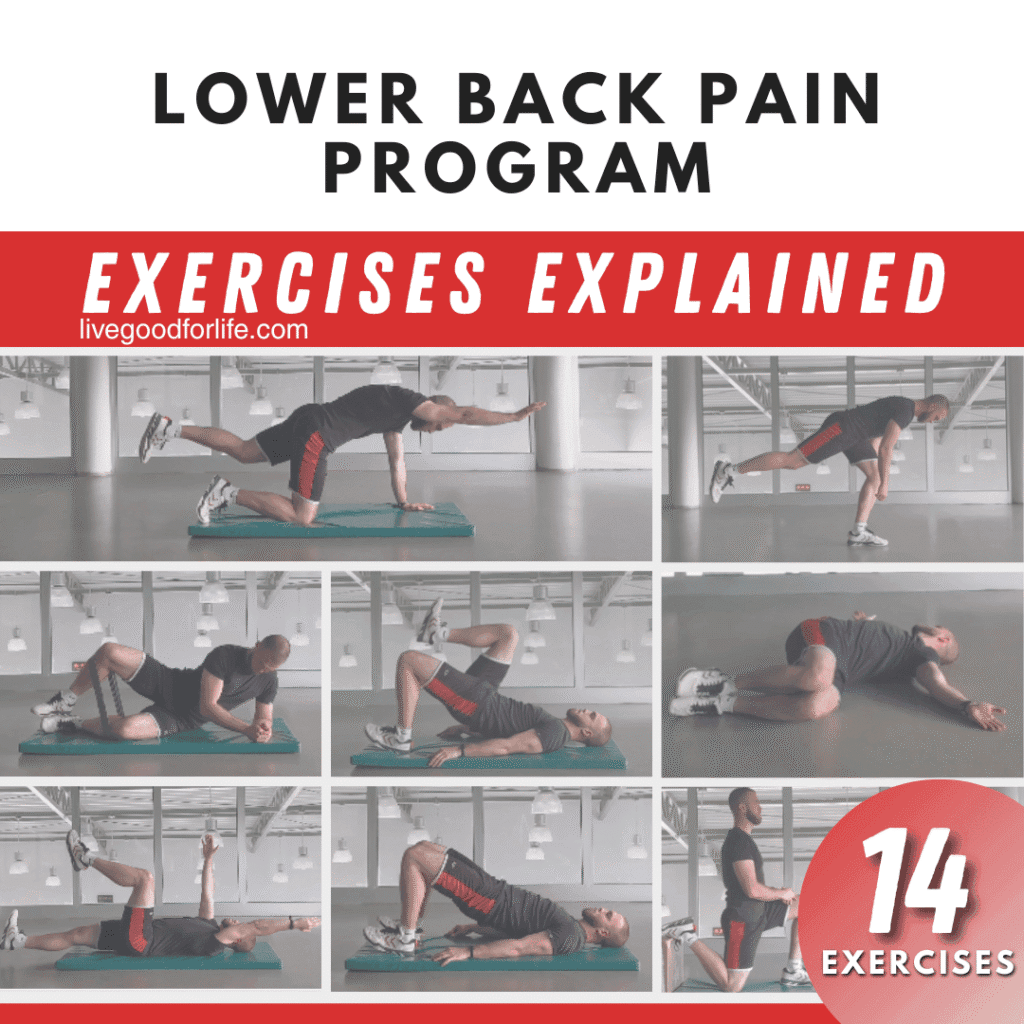
Lower Back Pain Course: 4-Week Beginner Program
Lower Back Pain Course: Start Here
This lower back pain course is a beginner-friendly 4-week program built around simple movement, core control, hip strength, glute activation, mobility, and better daily habits.
The goal is not to force your body or push through pain. The goal is to learn how to move with more control, build support around the hips and core, and practice exercises that may help many people feel more confident with everyday movement.
Important disclaimer: This course is for educational purposes only and is not medical advice, diagnosis, treatment, or physical therapy. Stop any exercise that causes sharp, worsening, radiating, or unusual pain. Speak with a qualified healthcare professional before starting if you have severe pain, pain after an injury, pain traveling down the leg, numbness, weakness, bladder or bowel changes, fever, unexplained weight loss, a history of cancer, osteoporosis, pregnancy, or any medical concern.
Quick Course Overview
| Course detail | Simple explanation |
|---|---|
| Length | 4 weeks |
| Level | Beginner-friendly |
| Main focus | Core control, hip strength, glutes, mobility, and safer movement habits |
| Best for | People who want a simple home routine and gentle movement structure |
| Not for | Severe, worsening, radiating, or unexplained pain without professional guidance |
How to Use This Course Safely
- Move slowly and stay in control.
- Use a smaller range of motion if needed.
- Stop or modify any exercise that increases pain.
- Do not push through sharp, radiating, or worsening pain.
- Rest when needed and progress only when the basics feel comfortable.
What This Lower Back Pain Course Works On
This course is organized around the areas that often matter most for better movement: hips, glutes, core stability, upper-back mobility, and bending mechanics.
| Course area | Why it matters |
|---|---|
| Hip mobility | Stiff hips can make the lower back do more work during movement. |
| Glute strength | The glutes help support walking, bending, standing, and lifting patterns. |
| Core control | The core helps the spine stay steady during movement. |
| Upper-back mobility | A stiff upper back may make the lower back compensate during reaching or rotation. |
| Hip hinge practice | Learning to bend through the hips can make daily movement feel more controlled. |
Course Exercise Library
These are the main exercises used throughout the 4-week program. Start with the easiest version that feels comfortable. You do not need to master every exercise on day one.
1. Hip Hinge Technique
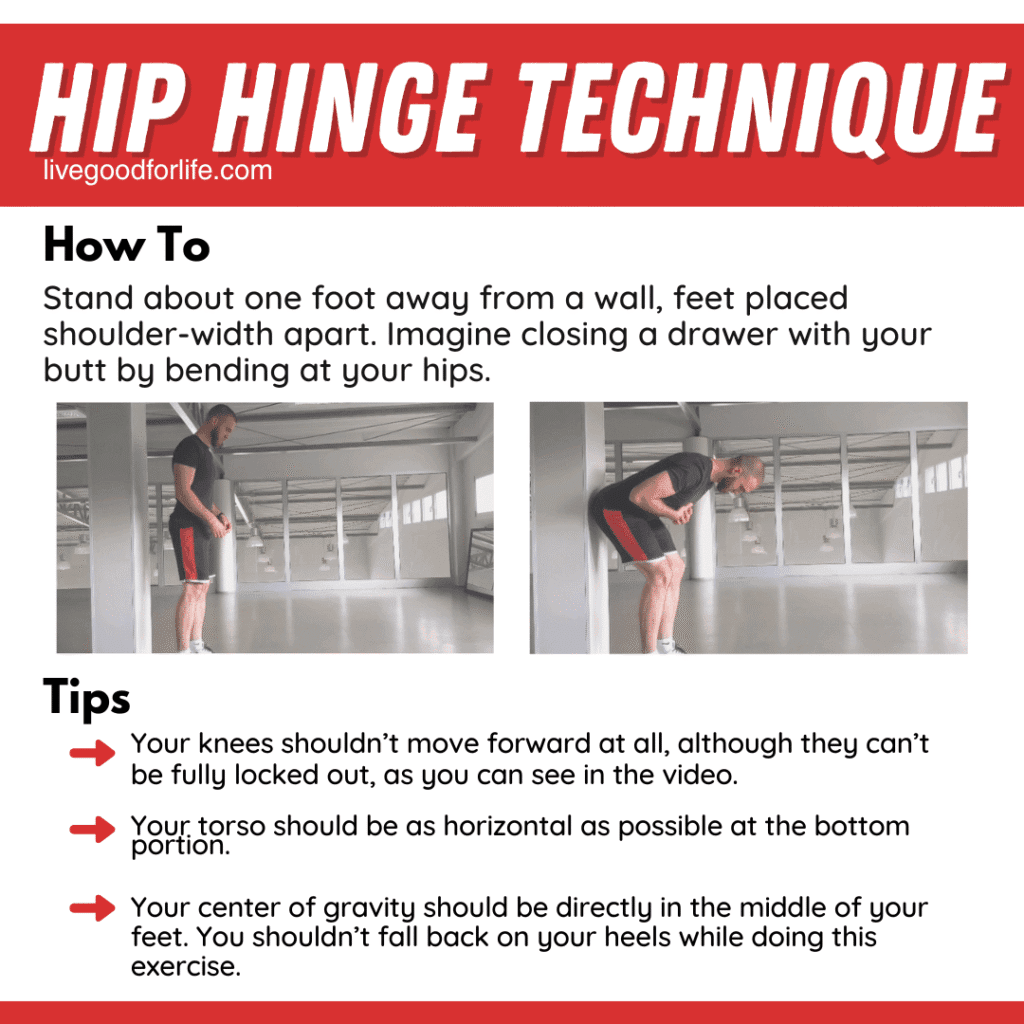
Stand about one foot away from a wall. Push your hips back toward the wall while keeping your spine long. This teaches you to bend more from the hips instead of rounding through the lower back.
2. Dead Bug
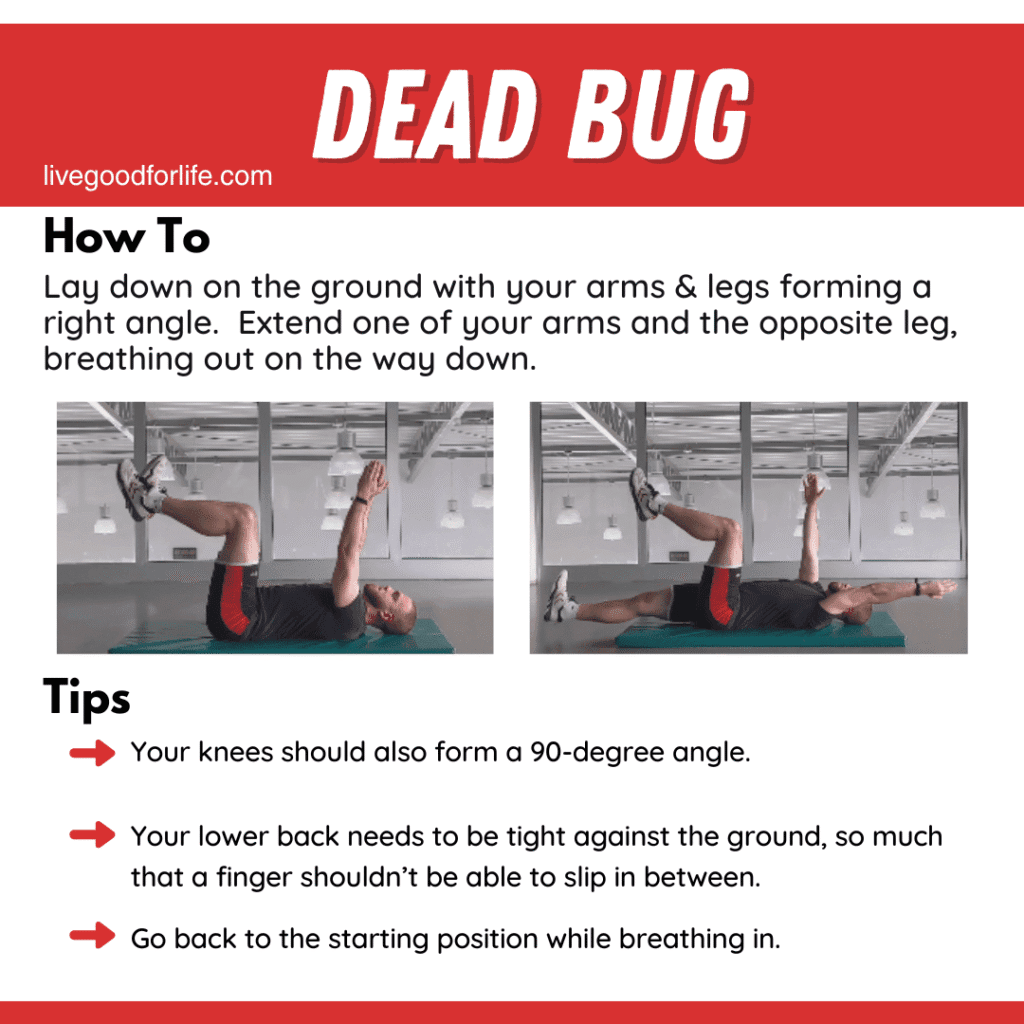
Lie on your back with your arms up and knees bent. Slowly extend one arm and the opposite leg, then return to the starting position. Keep the movement slow and controlled.
3. Bird Dog

Start on your hands and knees. Extend one arm forward and the opposite leg back. Keep the torso steady and avoid twisting or arching through the lower back.
4. Side Plank

Lie on your side with your elbow under your shoulder. Lift your hips and keep your body aligned. Beginners can use a knee-bent version first.
5. Pallof Press
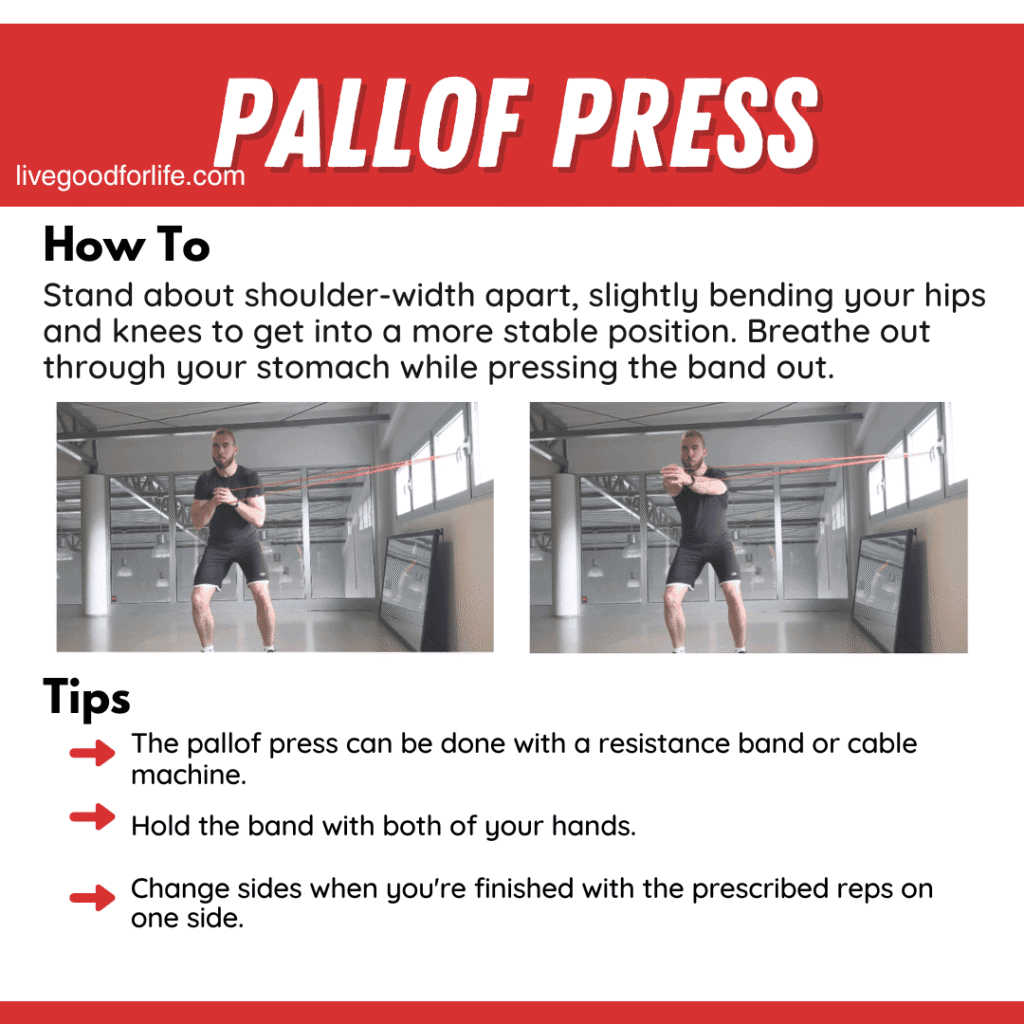
Use a resistance band or cable at chest height. Press your hands forward while resisting the pull from the side. Keep your torso steady.
6. Glute Bridge
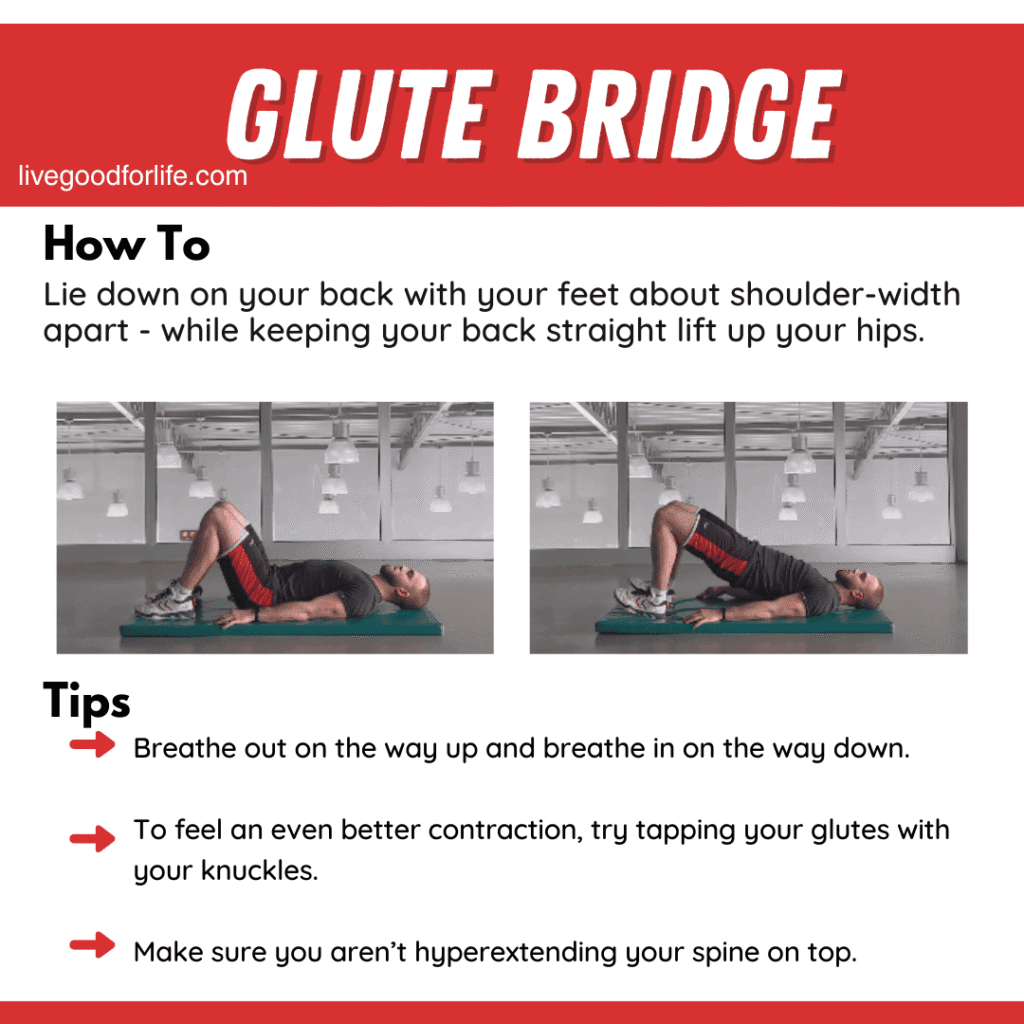
Lie on your back with knees bent. Press through your feet and lift your hips. Squeeze the glutes gently at the top without over-arching the lower back.
7. Single-Leg Glute Bridge
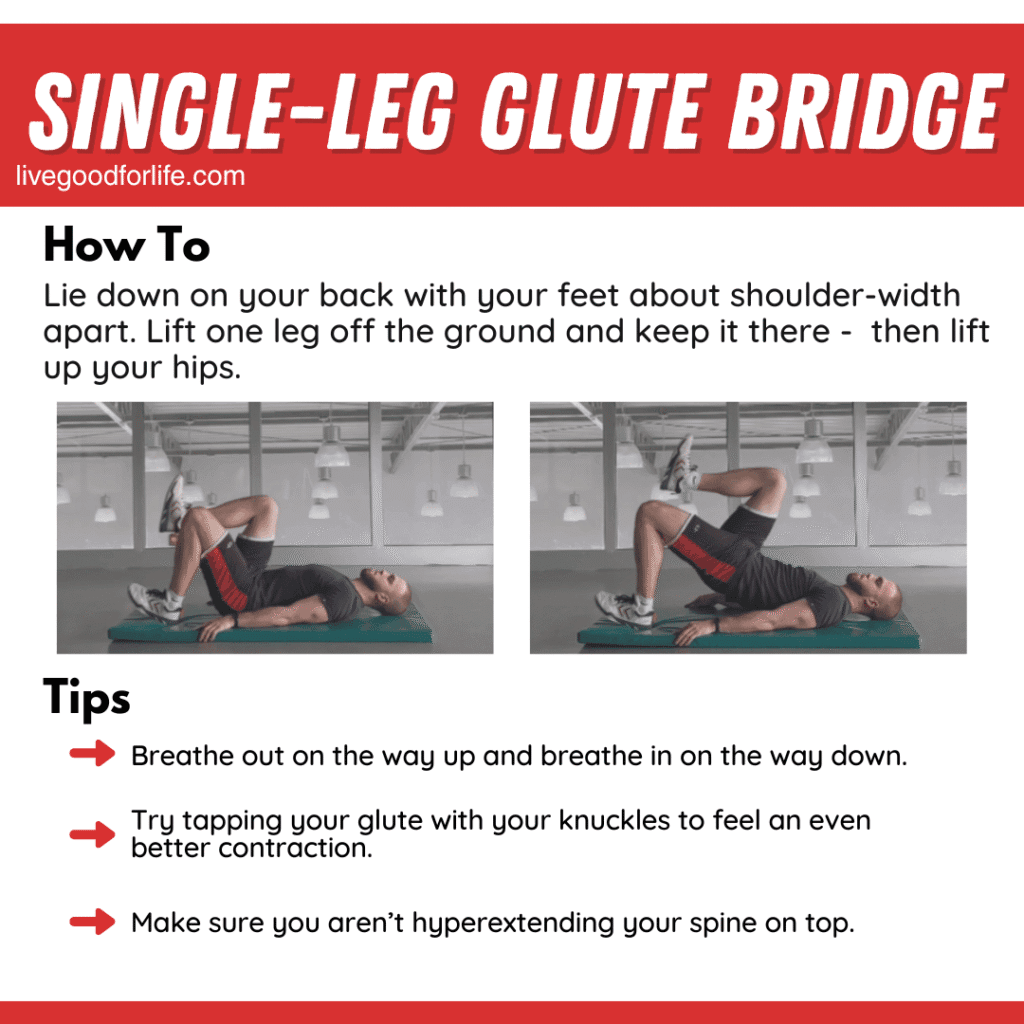
This is a harder version of the glute bridge. Keep one foot on the floor and one foot lifted. Raise and lower the hips with control.
8. Clamshells
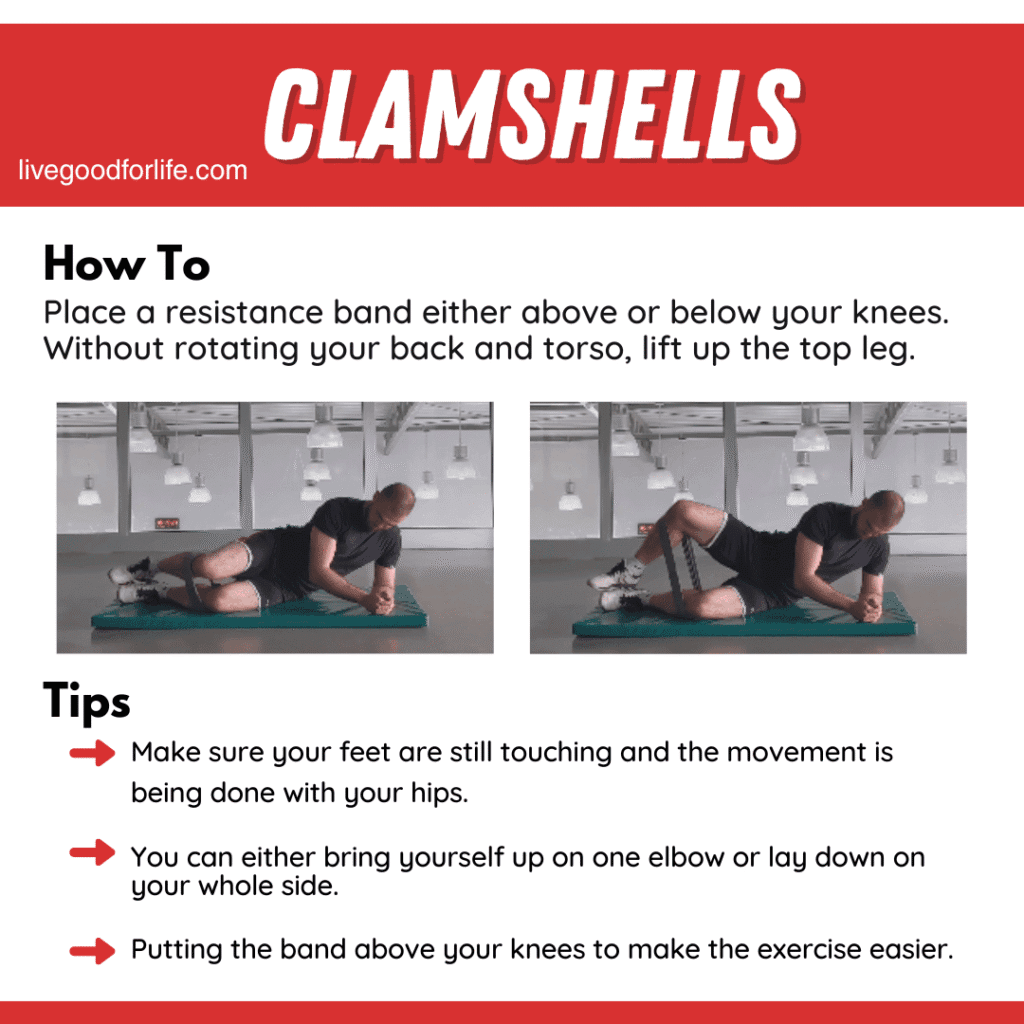
Lie on your side with knees bent and feet together. Lift the top knee without rolling your body backward. Move slowly and keep the work in the hip.
9. Donkey Kicks

Start on your hands and knees. Lift one bent leg using the glute, then lower with control. Keep the lower back steady and avoid kicking too high.
10. Single-Leg Deadlift
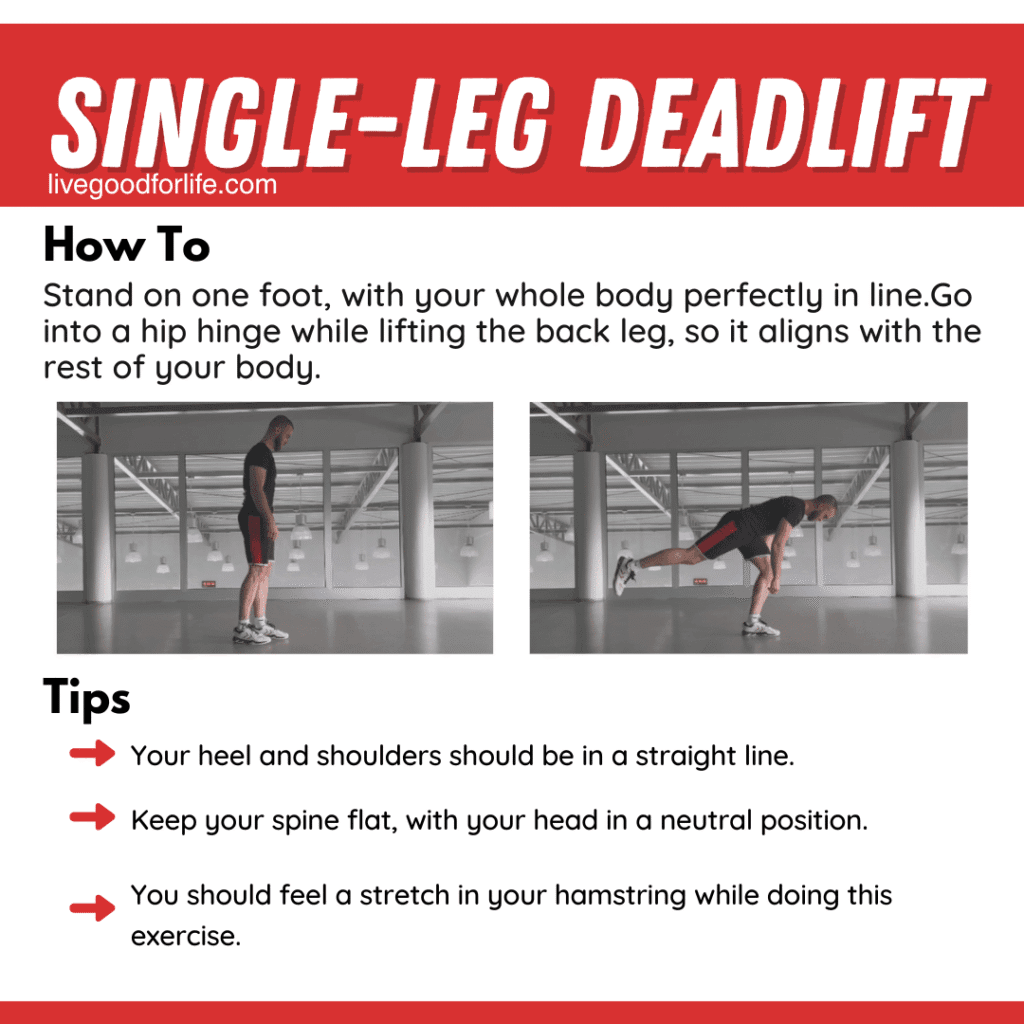
Stand on one foot and hinge from the hips while the other leg moves behind you. Keep your spine long. Use support nearby if balance is difficult.
11. Couch Stretch
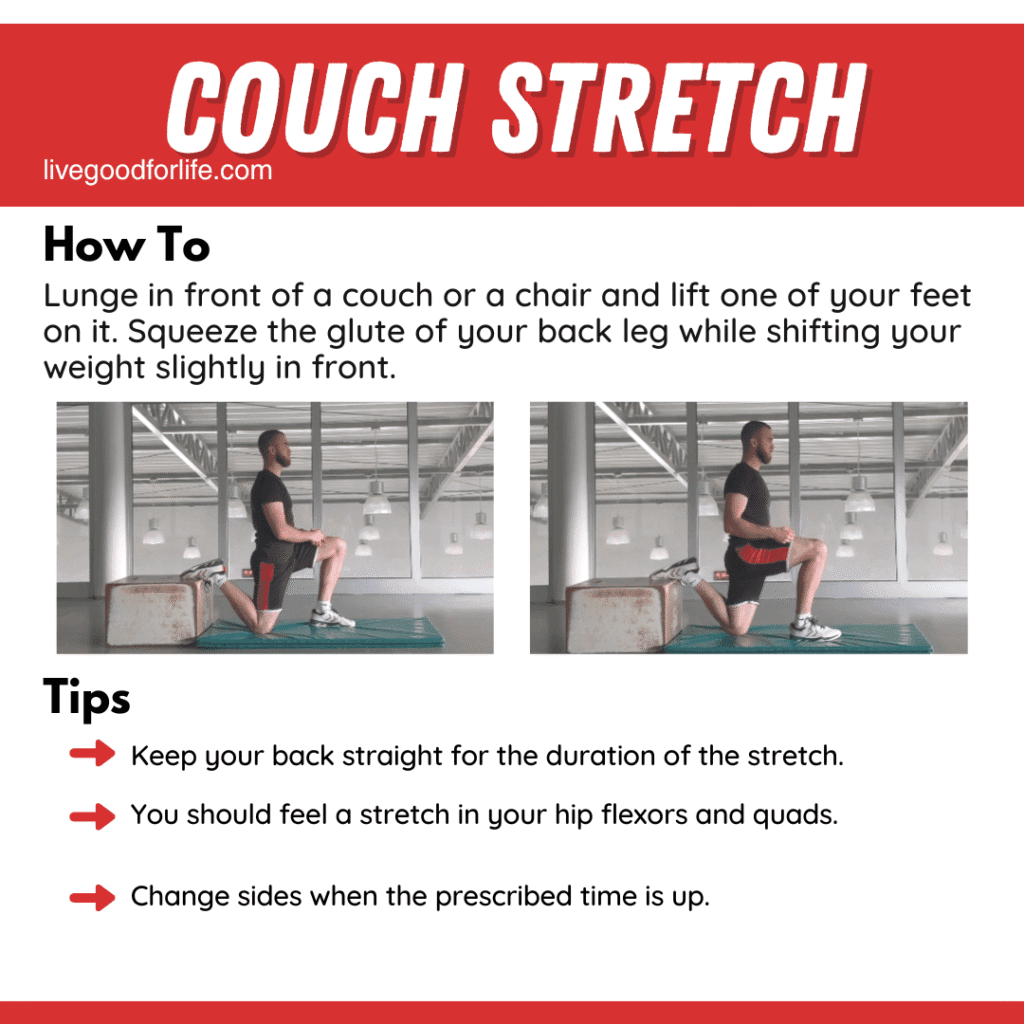
Place one foot behind you on a couch, bench, or chair. Gently shift forward until you feel a stretch in the front of the hip and thigh. Keep the torso upright.
12. Cross-Legged Stretch
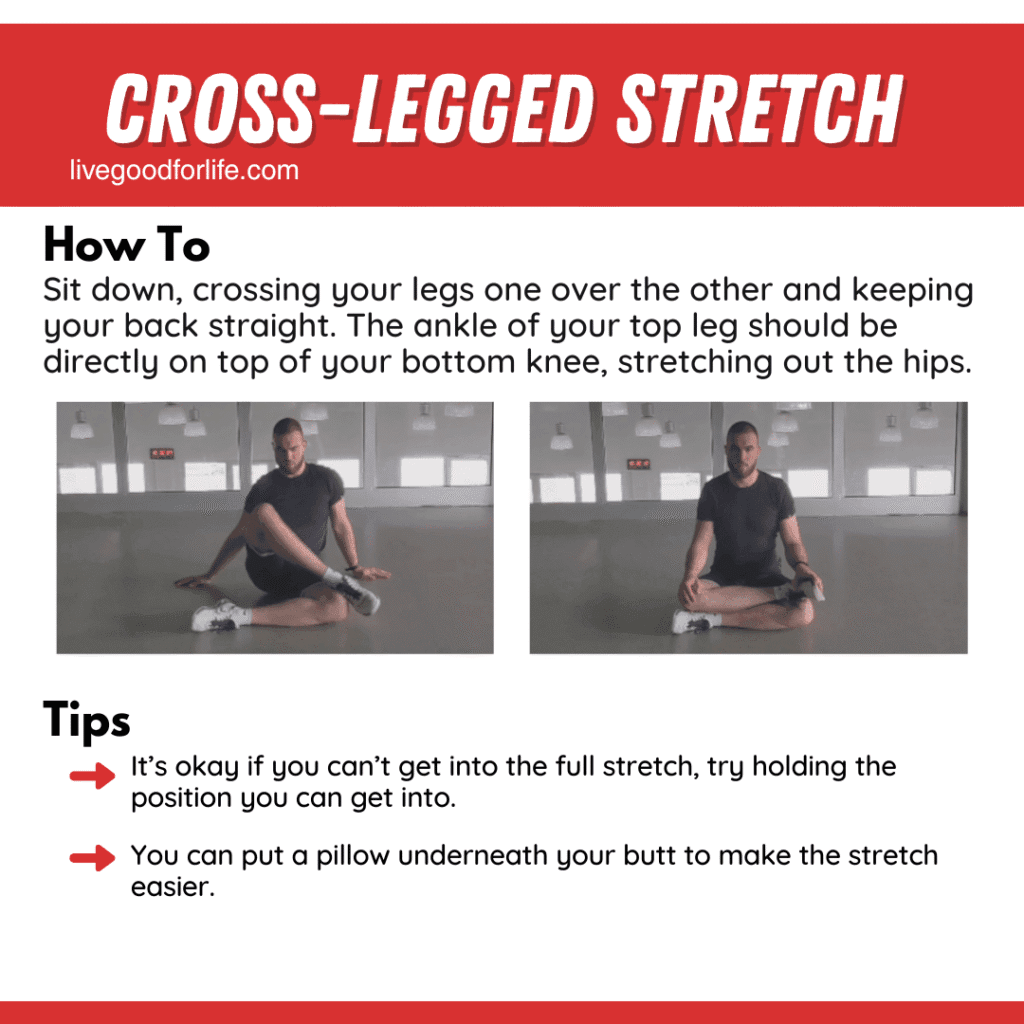
Sit on the floor and cross one leg over the other. Keep your back as upright as comfortable. Use a cushion if the position feels too difficult.
13. Kneeling Thoracic Stretch
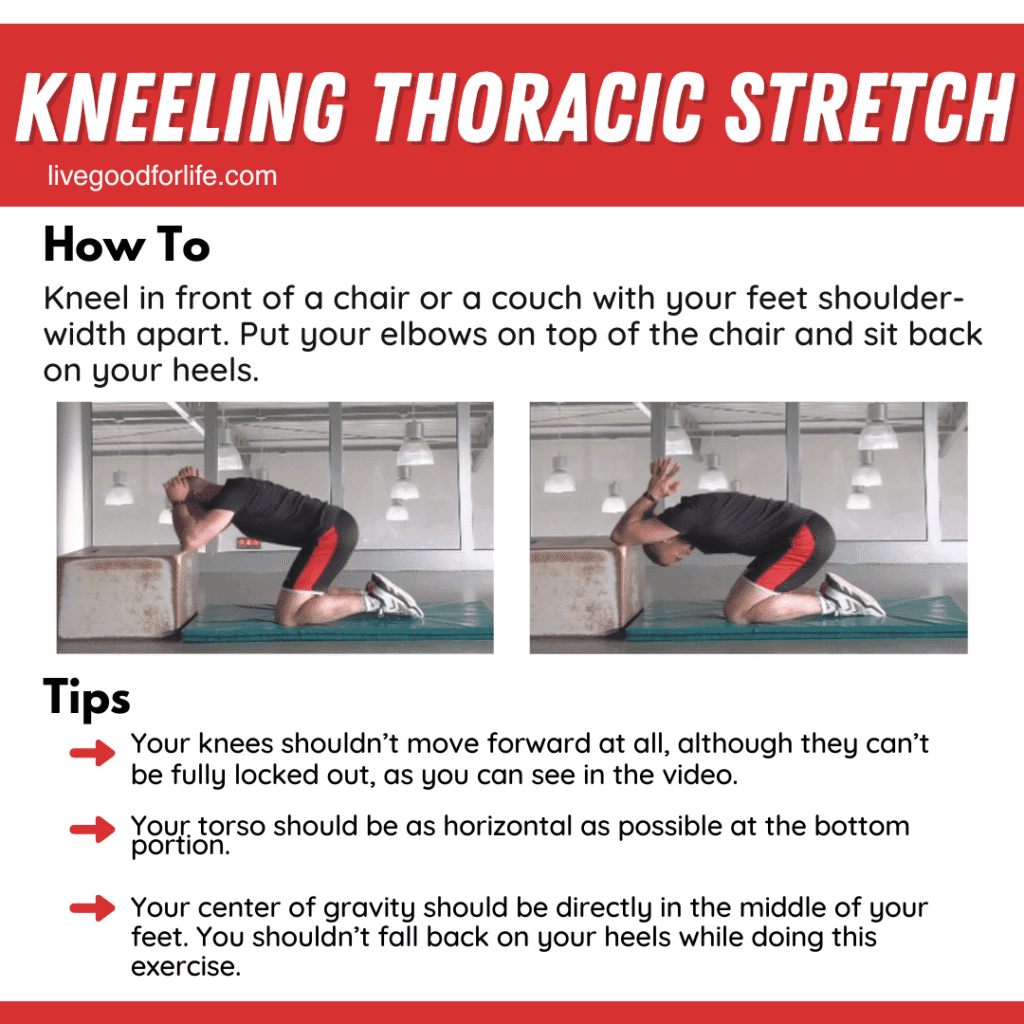
Kneel in front of a chair or bench. Place your elbows on top and gently sit your hips back while your chest lowers. Keep it comfortable.
14. Open Book Stretch
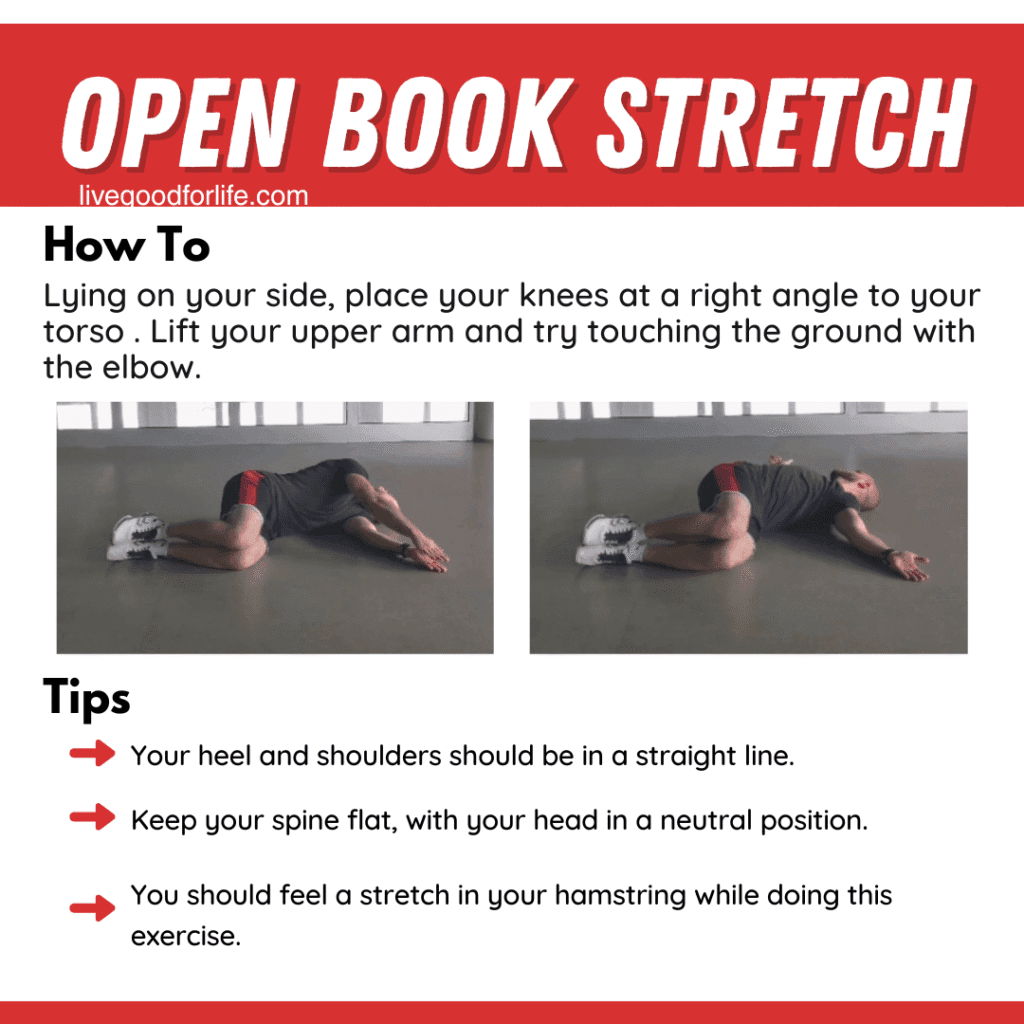
Lie on your side with knees bent. Reach the top arm across your body, then slowly open it in the opposite direction. Let the upper back and chest rotate gently.
The 4-Week Lower Back Pain Course Plan
This program is designed to be followed over 4 weeks. A common structure is 4 training days per week, with rest days between sessions when needed. Keep the routine flexible and listen to your body.
| Week | Course focus | How to approach it |
|---|---|---|
| Week 1 | Learn the foundations | Practice form, keep the range small, and focus on control. |
| Week 2 | Add consistency | Repeat the basics and add a little more work only if tolerated. |
| Week 3 | Build confidence | Use slightly harder versions when the easier version feels comfortable. |
| Week 4 | Strengthen the habit | Keep the best exercises, continue moving slowly, and avoid rushing progression. |
Week 1: Learn the Foundations
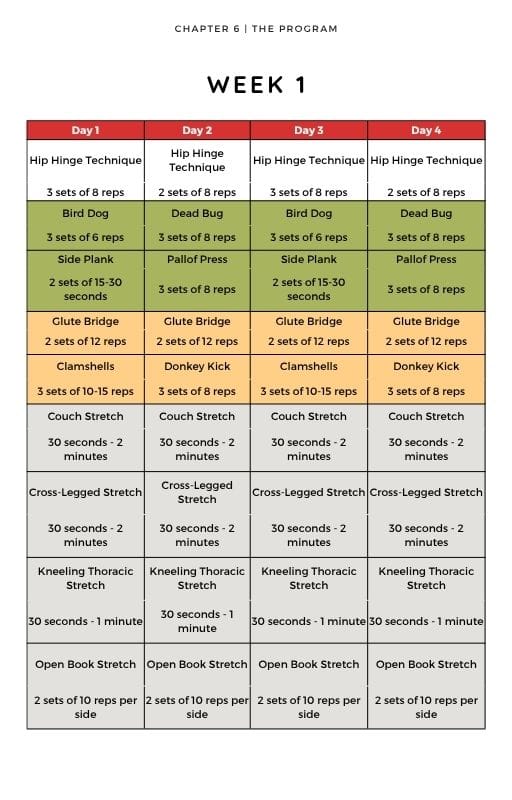
Week 1 is about learning the movements. Focus on the hip hinge, dead bug, bird dog, glute bridge, clamshells, and gentle mobility. Do not worry about intensity yet. The priority is form.
Week 2: Add Consistency
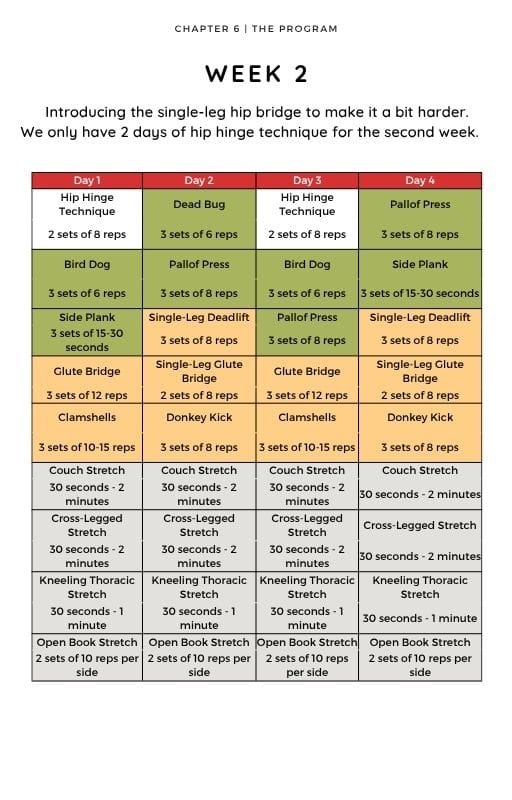
Week 2 keeps the same foundation but adds more consistency. You may add the single-leg glute bridge if the regular glute bridge feels comfortable. Keep the effort controlled.
Week 3: Build Confidence
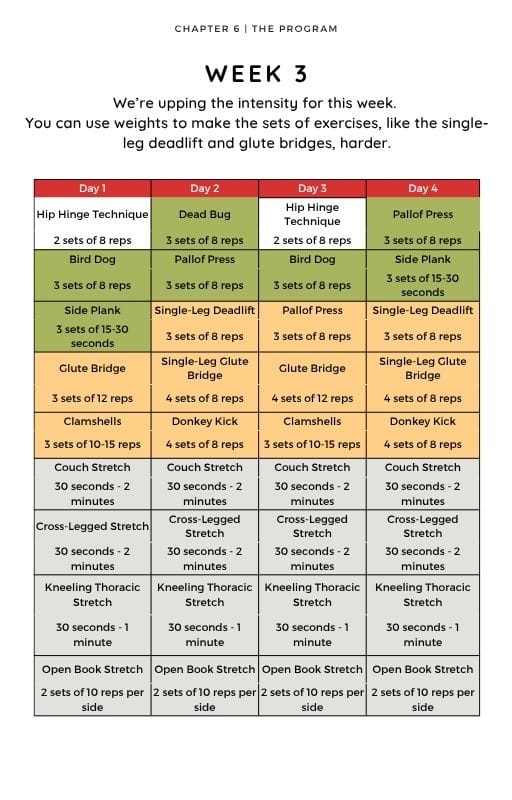
Week 3 adds a little more challenge. Exercises like the single-leg deadlift or longer side plank holds may be added only if the easier movements feel steady and comfortable.
Week 4: Strengthen the Habit
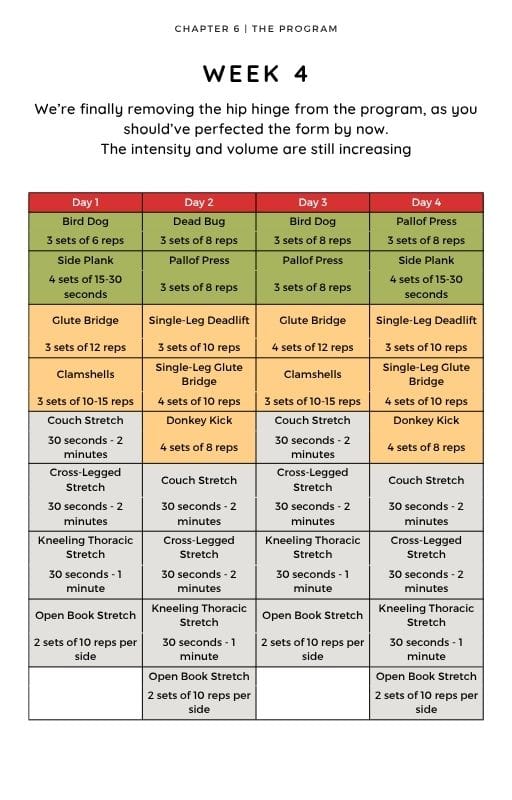
Week 4 is about putting the pieces together. Keep the exercises that feel useful, continue practicing controlled movement, and think about what routine you can continue after the course ends.
Daily Movement Tips During the Course
- Take short standing or walking breaks if you sit for long periods.
- Practice bending from the hips when picking things up.
- Use walking as gentle movement if it feels comfortable.
- Prioritize sleep, hydration, and balanced meals for general recovery support.
- Keep a simple note of which exercises feel best and which need modification.
Food and Supplement Notes
Food choices, sleep, hydration, and recovery habits can support overall wellness. Some people also compare supplements such as omega-3s, turmeric, curcumin, or combination formulas as part of a broader wellness routine.
Supplements should not be used to treat lower back pain or replace exercise, medical care, or professional guidance. If you take medication, manage a health condition, or are unsure whether a supplement fits you, check with a qualified professional first.
Related reading: LiveGood Factor 4 Review and Anti-Inflammatory Supplements Guide.
Frequently Asked Questions About the Course
Who is this lower back pain course for?
This course is for beginners who want a simple exercise structure focused on movement, hip strength, glute activation, core control, and mobility. It is not for severe or unexplained pain without professional guidance.
How often should I do the course workouts?
A common starting point is 3 to 4 short sessions per week. Use rest days as needed and avoid doing more if your body is not tolerating the routine well.
Can beginners do this course at home?
Yes, many of the exercises can be done at home with little or no equipment. A resistance band may be helpful for some movements, but it is not required for every exercise.
Should I push through pain?
No. Mild effort or muscle fatigue can be normal, but sharp, worsening, radiating, or unusual pain is a reason to stop and get guidance if needed.
What happens after the 4 weeks?
After finishing the course, some people repeat it with better form, while others move into a general strength and mobility routine. The best next step depends on how your body responds.
When should I see a healthcare professional?
Get checked if pain is severe, worsening, traveling down the leg, causing numbness or weakness, following an injury, or not improving over time. Also get help right away for bladder or bowel changes, fever, unexplained weight loss, or other concerning symptoms.
Final Course Notes
A lower back pain course does not need to be complicated to be useful. The basics matter: controlled movement, hip and glute strength, core stability, mobility, and better daily habits.
Go slowly, stay consistent, and adjust the course to your comfort level. The goal is steady progress, not perfect performance.


![Weight Loss Guide for Fat Loss, Meal Plans & Natural Supplement Tips [PDF]](https://livegoodforlife.com/wp-content/uploads/2025/04/Weight-Loss-Guide-PDF2.jpg)